Welcome!

I craft! Spinning, sewing, knitting, quilting...it's all here, along with so much more. I just love making things and writing about them. I hope you'll join me.

Craftsy

Craftsy

Search This Blog

Showing posts with label Friday Tutorial. Show all posts

Friday, February 7, 2014

Friday Tutorial: Month in Review

Month in Review! 

I'm cheating a little here on this Friday tutorial! I figured with all of the tutorials and lessons I've done over the past month it would be nice to take a look at what we've done and offer up a month in review. You can also see all the tutorials I've posted by clicking the "Tutorials" page tab at the top.


To keep up-to-date on everything we're covering on a weekly basis, please sign up to receive our weekly newsletter. It will include any special events and links to the past week's tutorials and topics.


Friday, January 31, 2014

Friday Tutorial: Finishing the 2 at a Time Hats

We're nearing the end of our hats! This week we're going to finish them up and learn how to decrease stitches using double knitting. You may want to use a cable needle or stitch holder of some sort, as you will need to move stitches around to do the decreases. Once I've made a few decreases and they get closer together, I will usually just move all of the stitches from one hat to a new set of needles to "hold" it and finish them separately. This works out pretty well and is a little less stressful. However, it doesn't work so well when you're working the heel of a sock, so i'm going to explain how this is done - just in case you want to do it.

The pattern tells us to knit 6 and decrease (knit together)2. So for our hats, we'll knit the first 12 stitches (6 blue, 6 orange) and then slip 1 blue stitch.


Slip 1 blue stitch

To get your stitches next to each other you need to drop one orange (back) stitch from your needle, work the knit 2 together with the blue, then place the dropped stitch back on the needle to knit two orange together.

move 1 orange stitch to holder
Move blue stitch back to working needle, knit 2 together
Slip orange stitch back to working needle

2 orange together


 I usually just hold my dropped stitch in my left hand, work the k2tog, then place it back on the needle. However, you CAN use a small cable needle here or a juice pouch straw or something to hold that stitch if you're afraid you can't keep it from dropping and running. We want to be careful we don't knit a blue and orange together either. That defeats our whole purpose.
holding dropped stitch 

If you want to separate the hats to make the decreases, you will need a circular needle or another set of dpns to hold the stitches on one hat. It doesn't have to be the same size, as you're just holding them and can move them back once you complete the first hat.

Working in reverse of our cast on, slip 1 blue stitch to the working dpn. Slip 1 orange stitch to the holding needle. Keep slipping stitches until they are all moved. Pull the inside hat up through the top of the outside hat and lay aside to work later.


Finish your hat as directed in the pattern and voila! you have a hat to share and one to keep. Or give both. Or whatever. I hope you had fun with this tutorial series and learned a lot. I also hope you try this technique with other applications like sleeves and scarves. If you would like to donate your extra hat, would you consider donating it to my charity Warm Up the Boro? I collect donated hats and scarves and hand them out in our community during the cold winter months. You can find out more on our Facebook page http://www.facebook.com/warmuptheboro.

As always, please post pics to the Flickr group!

Thursday, January 30, 2014

Sewing on Thursday: Sewing Skill Builder Series

Most of us buy a sewing machine with a singular goal in mind. Learning to sew probably tops the list for those that don't know how. We want to make things. Awesome things. All those things we see on Pinterest! So we buy a sewing machine. And it sits in the corner. Because we can't figure out how to thread it. Or use it. And all those things we had dreams of creating sit in the corner with it. Or fill up our Pin boards.
Bone needles

Which brings up the question, how did people learn to do things before they had the internet? It was passed down from generation to generation. First, people learned to create by hand. They used bones, animal guts, and eventually iron needles.

They passed these techniques down and future generations improved on them. Then in the 1800's the first functional sewing machines were built, but were failed enterprises because of fears the "machines" would put tailors and seamstresses out of business! Elias Howe received the first patent on a working sewing machine in 1846, upon which Isaac Singer stole used Howe's patented mechanism to make a foot treadle machine that became wildly popular. Bellis, Mary. The History of the Sewing Machine. About.com http://inventors.about.com/od/sstartinventions/a/sewing_machine.htm

My circa 1908-1913 Singer Treadle - needs work, but I love it
As everyone was trying to invent the machine, seamstresses across the world were still teaching their daughters the "old ways" of mending, stitching, sewing, and embroidery by hand, in preparation for running their own households. Mothers would sit their daughters down and show them a stitch, then give them instructions to create sample pieces. As the girls worked on their sample pieces, they would create works that blended all of their stitches and lessons together. These became known as samplers and some were quite valuable later on.

So with the background lesson, we come back around to using a sewing machine. Mothers don't always set their daughters down and teach them to sew anymore. Grandmothers may live somewhere far away, have passed away, or never learned themselves. So arts start to disappear. Thankfully, we DO have the internet and books. Lots and lots of books.

I love finding vintage sewing books. They are chock full of information that you can't even find on the internet today. One of these books that I found I have treasured for a long time. It's called Creative Machine Stitchery and is published through Better Homes and Gardens in 1985. I've been wanting to work through it bit by bit and teach myself some new things, making a sampler and putting it to good use.


One of the lessons in the book is on using your machine's potential. Aha! This is sounding good enough to do a skill builder series on!

Sampler pockets for sewing basket
I'm finally going to go through this book step-by-step and share what I learn with you, hopefully teaching you some things along the way and helping you to use that machine sitting in the corner. There are a few lessons and projects that I will not be using, but I'm choosing the ones that I think will help improve and teach sewing. Here is the outline and what you have to look forward to:

Lessons

1-6: Sewing samplers to create sewing basket pockets
You will learn to create various size zig zags, openwork, puffing, couching, smocking, and faux French hand sewing.

7: Assembling the Samplers

8:  Fabric Collage Pin Cushion
We will learn how to do a little pit of applique to make a pin cushion to hang off of our sewing basket sampler.

9. Making a Rug out of Yarn - on the sewing machine
This is one of those very interesting techniques that have been rediscovered and are very exciting for me!

10. Using the machine to stitch on canvas
We'll use our machines to make needlepoint-style stitches on canvas

Materials

These are the materials needed for the first 8 lessons. The other two I'll give you plenty of heads up for as we get nearer.


  • 1/4 yard each of 3 different fabric colors (they use ecru, off-white, and cranberry)
  • 1/2 yard muslin
  • 1/2 yard quilt batting
  • 3 colors of sewing thread to match your fabrics
  • polyester fiberfill
  • 1 package pre-made binding for pockets, 2 pkgs. pre-made binding for alternating pockets and to join pockets. (you can also buy a little extra of your 3 materials to make binding) 
  • 17" 1/4" wide lace
  • 8.5" of 1.25" wide lace beading (I'll be doing a crochet lesson on this before we get to it, so if you can crochet it, don't buy it! Same goes for the doily. I'll be making mine, but not sharing the lesson.) 
  • 17" entredeux (french lace that goes between panels. I will also be giving a lesson on how to make this homemade, but it may be worthwhile to purchase it.) 
  • 1 yard Belgian lace
  • Lace doily (very small, for pincushion)
  • cording of various thickness
  • flower applique
  • typing or stabilizing paper
  • marking pen
  • elastic sewing thread 
Ok, so here's your chance! Let's do this thing and learn how to use that machine! 


Friday, January 24, 2014

Friday Tutorial: Knitting Two Hats at a Time, Part 2

 Last week we left off on finishing up our ribbing for the brim of our hats. We discussed how to cast on to four double pointed needles using two different yarns and how to keep the stitches divided so that we end up with two separate pieces of fabric. This week we're going to take a look at how to make stockinette stitch so we can work on the body of the hats.

Stockinette simply means that we knit every stitch on every row. To do this with our two yarns in double knitting, we will have to bring the front yarn forward and backward, but leave the back yarn in the back. The difference is that we no longer have to worry about moving the back yarn to the front.

Now, this CAN be done without moving either if the yarns and working a reverse stockinette in front (purl every front stitch) and a regular stockinette in back. However, when I did this with my first pair of two-at-a-time socks, I ended up with horrible ladders where the joins were. This method seems to work better.

Following Rachel's pattern, we start knitting in stockinette for the body. To begin, make sure both yarns are to the back and you are starting with your front color (blue in my case) to make a knit stitch.


Make the knit stitch, then move the front yarn to the front of the work.

Make the second knit stitch with the alternate color (orange).


Now move the first color to the back of the work to make the third stitch. Continue in this manner until you have knit you're hat to the length specified for the body before making the decreases.
Knit in stockinette the hat starts to take shape

For part 3 next week we will finish the hat by learning how to decrease the stitches for the top of the hat. 

Friday, January 17, 2014

Friday Tutorial: Knitting Two Hats at a Time, Part One

 Remember in Tuesday's knitting post that I promised a tutorial for knitting two hats on a set of double point needless? Here it is! I didn't want to do socks because there are a couple of tutorials and classes out there, the ones I'm familiar with were listed in the last post. But me and my self thought that since we had already done socks, a hat would be a breeze. No short rows for one thing! What is amazing about knitting these two at a time is that you can make a multitude of things using this method. I'm anticipating working some sweater sleeves for one thing. No more single sleeve sweaters!

I'm using a very simple hat pattern from Ravelry by Rachel Sonntag called  Simple Beginner Toddler Hat. It's a basic ribbed brim and stockinette stitch in a worsted weight yearn. If you'd like to follow along with this pattern, please check out her link and download it for free from Ravelry.

Materials:

Pattern Simple Beginner Toddler Hat
4 oz worsted weight yarn in 2 contrasting colors
Size 6 dpns (or size needed to obtain gauge)
Size 6 knitting needle at least 10" long
stitch markers

Ok, once you have your pattern downloaded it is important to note the gauge. Her pattern calls for size 6 dpns and circulars. We're using 4 or 5 dpns only because it more closely relates to doing the socks later. However, you can also use this method on a circular needle. I knit loosely, so I always drop a size down. When knitting two at a time, your stitches are spaced further apart than normal too. So it is a good idea to go down one or two sizes to match the gauge. I'll be using 5 size 4 dpns.

Casting On


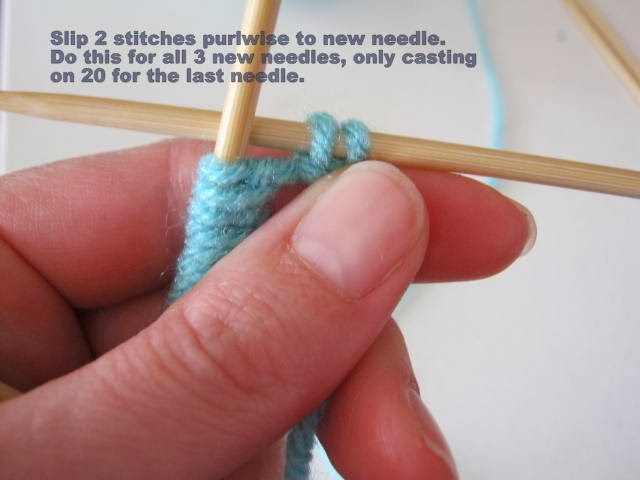
Cast on the required number of stitches for your chosen size. I do this using the super stretchy method for the ribbing (follow link for YouTube video). I cast on to 4 of my 5 needles. When I do this I just work one or two stitches more than I need on the first needle and slip them to the next one so I'm not concerned with making a new stitch.


For example, each of my needles will have 22 stitches for a grand total of 88. I cast 24 on to the first needle, slip 2 to the new needle, and work 22 more, slipping 2, k 22, sl 2, k20. Then join.


Now for the fun part! Knit one round in ribbing. Just like a normal hat. Then when you reach the next round, we join our new yarn and second color.

Joining the new yarn requires that you first cast on the total number of stitches (88 in this case) to a longer straight needle the same size as what you are knitting with.

Long straight needle with 88 stitches cast on
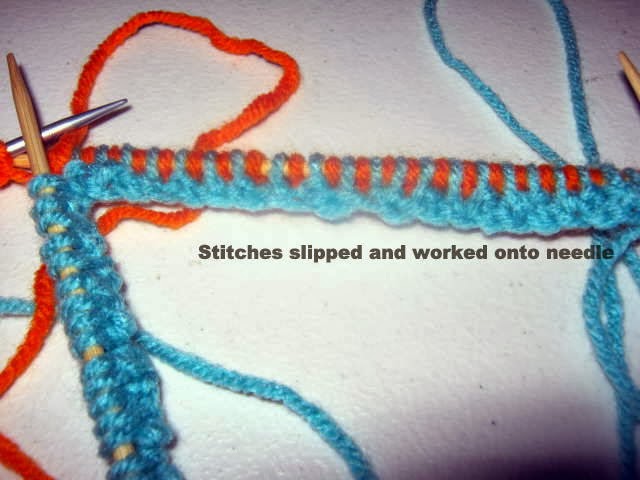
Now, holding the straight needle in back of your first dpn, slip the first stitch from your dpn purl wise. Then, knit 1 stitch from the straight needle. Slip the next stitch purl wise from the dpn (blue) and purl the next stitch. Remember to move your working yarn (orange) back to the back of your work before slipping the next (blue) stitch.


You'll only be working with 1 thread from the straight stitches. In essence, what you are doing is knitting the first row of the second color while placing the stitches onto the dpns. This works much better than trying to cast on each color initially. You're also working in k1, p1 ribbing to match the ribbing on the first row of the first color. Continue to slip stitches from the front row (blue) and working k1, p1 from the back row (orange) until all of the stitches have been worked.

Whew! That's a lot of stitching! If you've made it this far, congratulations. You've cast on your stitches and you're ready to begin the yarn acrobatics of double knitting 2 at a time.


Knitting the Ribbing

For the next part we are going to work with 2 strands of yarn. Your fingers will need some training. I like to hold my yarns with my pointer finger between the two strands, working forward and backward as required. I've tried one of those finger things for stranding and they just didn't work for me. They may for you, though. This is difficult, so don't lose patience. Just keep trying different methods until you find what works for you. 


For row 2, you will hold both strands of yarn to the back because you are working a knit stitch. With your strands separated, knit the first stitch from needle 1 (blue).


Move the blue strand to the front of the work. Knit the next stitch (orange), but keep the yarn to the back.


This should read "Keep yarn forward, knit next orange stitch" 


Purl the next blue stitch and leave your yarn in front as if to purl.


Pull the orange yarn to the front of the work and make your purl stitch. Then move both yarns back to the back. After four stitches you will be in the same position that you started in, with both yarns to the back of the work and ready to make a knit stitch with the first color. 

You will continue to do this until your piece measures what is stated in the pattern. 


I'm going to leave the remaining part of this tutorial for next week. Work on the ribbing, don't get frustrated, and remember that a good cup of coffee is a great cure for aggravation. If you have any questions, feel free to leave them in the comments. You can also find my pattern notes and project on Ravelry

Craftsy

Craftsy

LinkWithin

Related Posts Plugin for WordPress, Blogger...