The always amazing Leah Day of Day Style Designs (365 Free Motion Quilting Motifs) has a fantastic new video out. If you've ever wondered about foundation piecing or how to do it on the diagonal, this video will help you learn how! Check out all of her wonderful resources and over 500 videos on YouTube.

An eclectic mix of knitting, crocheting, quilting, spinning, and adventures of a dynamic mother of five. I enjoy life and pursuing what it has to offer!
Craftsy

Showing posts with label art quilt. Show all posts
Showing posts with label art quilt. Show all posts
Monday, July 29, 2013


Sunday, July 28, 2013
Creating a Sewing Machine Stitch Bible
About 2 posts back I talked about a new class I was taking through Craftsy, called Stupendous Stitching. One of the first lessons in the video encourages you to make a Stitch "Bible." This is basically a personal reference for all of the pre-loaded stitches on your sewing machine - most notably those of the decorative stitches. My Janome came with 222 decorative stitches. The other 48 are utility and bridge stitches. There are also 5 different fonts included. So my Stitch Bible is going to take me some time to finish. I spent 4 hours on it today and got up to #84. I wanted a reference to my utility stitches and buttonhole stitches as well.
So my book is going to be laid out in stitch order. The class suggests you can do it in any order you like, but since mine are arranged by stitch type, I figured it would be best to stay sequential! I decided I wanted it to look somewhat neat and tidy, too, so I first started by choosing to run an outline stitch every 1 inch. This made it look kind of like notebook paper. The awesomeness of the Janome is that the extension table and the throat plate have ruler markings, making it easier to measure up to 10" past the needle. I also decided that instead of using a marker to number the stitches, I would use the embroidery fonts for the numbers - meaning one less page of references.
I set up one page at a time to break away from the monotony of straight stitching. I also wasn't real sure how many pages I would need and no, I didn't feel like doing the math. I left the first section of each one blank - no number or stitches, so that I have room later on to put in grommets and tie the whole thing together. Beginning on #5 (since the first 4 are straight stitches with different back stitch choices), I started my utility stitches.

 |
| The first 6 pages! |
 |
| Markings every 1" |
 |
| Numbering the markings |

The difference between what the machine illustrations show and the actual stitches is pretty amazing. It is also fun to see how different the stitch is when messing around with the length and width of them.
 |
| What the machine shows and what the stitch actually is! |
 |
| Adjusting length and width of stitches |
I haven't finished it yet, but when I do I'll post it. I have to start a new quilt tomorrow, but that's the great thing about Craftsy. I don't have to complete my class during a webinar, or adjust my schedule to attend one. I also don't have to haul around materials, forget what I needed, risk taking my machine with me, etc., etc. It's right there, online, when I want it or need it. There is a material list and I can re-watch anything I might have forgotten. It's just this side of heaven! So it may take me a while, but I'm not rushed and I don't have to put anything aside right now. If you make a stitch bible or reference, please share it with me! You can upload to my Flikr group. Also, if you're taking this class I'd LOVE to hear your thoughts on it.
Tuesday, July 23, 2013
A Book Worth Blogging About
Nearly a year ago, I wrote a series of blogs about art quilting. I have never lost my desire to create one, but it seems I always have orders to attend to and they took up most of the remaining 10 months from August to June of this year. I had about 3 weeks of a break, then right back into fulfilling orders. Not that I'm complaining, but sometimes it would be nice to have time to create something new. An art quilt, for instance.
So I keep fueling my desire with images, information, and yes, books. I recently stumbled on a book I thought would be interesting through Interweave Press' Hurt Book Sale. (It ends July 25, 2013 so get there while you can!) I looked through the books being sold at a fraction of their original cost and found The Quilting Arts Book. I only paid about $5 plus shipping for it, but it is also available on Amazon.
This book not only inspired my imagination and fueled my desire to create, but it is packed with tips on creating collage, painting, thread painting, making fabric from paper, applique, and reverse applique. I probably missed a few, but it is literally everything you ever wanted to know about art quilting in ONE book. It has projects to work through, beautiful quilts to admire and draw from, and step-by-step how-to on nearly every technique. The only area they lacked in was whole quilt creation, but I think that is really out of place in this book anyway. Whole quilts are more of an artistic area all their own.So I keep fueling my desire with images, information, and yes, books. I recently stumbled on a book I thought would be interesting through Interweave Press' Hurt Book Sale. (It ends July 25, 2013 so get there while you can!) I looked through the books being sold at a fraction of their original cost and found The Quilting Arts Book. I only paid about $5 plus shipping for it, but it is also available on Amazon.

So I'm hoping with this new nudge I'll soon be taking you on a journey with me through creating my first art quilt. Step 1 is complete, and that was to buy a sketchbook with paper heavy enough for acrylic, watercolor, charcoal, pencil and collage. I found one fairly inexpensively at my local Hobby Lobby. With the coupon I paid a total of $4. It has 140lb paper safe for all media. You can also get it at Amazon for a little more, but if you're a Prime Member or don't have a Hobby Lobby nearby you save on shipping!
I hope you'll join me and maybe give me some thoughts and pointers of your own on creating art quilts. You can find all relative posts on my new page Art Quilts.

Saturday, July 20, 2013
What are all those pre-loaded stitches for?
In my recent review of the Janome MC8900 I mentioned that it came pre-loaded with over 250 decorative and utility stitches. So what in the world are they good for? Many things, actually. If you're a beginning sewist you'll probably decide you don't really need them and you're good with just a basic machine that has basic utility stitches (ie., straight lines, satin stitches, zigzags, etc.) and you'll be right. However, if you do invest in a machine like the 8900, you'll see that it has all of these fancy stitches and start thinking about putting them on dresses for little girls, shirts for boys, edgings on jeans and shorts, along curtain bottoms and insets in panels, table runners, pillowcases and on and on and on.
If you're a quilter, your mind will probably start to wander toward art quilts. Craftsy has a great class on how to use these stitches for your quilts to create fabulous works of art that are original and beautiful! The class is called Stupendous Stitching and I have recently enrolled in it, as art quilts are on my bucket list. And for the remainder of the day, this class is on sale for $19.99 - $10 off the original price.
I don't get in to hand embroidery much, but I do a lot of machine embroidery using my Brother SE400. The designs for them are fantastic and numerous, but I'm really limited on what I can do with a hoop and a pre-made design. I don't have design software, so I use what I find on the internet - mostly at Embroidery Library or Urban Threads. So the ability to combine stitches and make visual interest in quilts and other items is an attractive option. Janome also has a circular sewing attachment that lets you make these stitches in circular patterns. They even have a video about it. With only a 4" x 4" space available in my hooped embroidery machine, 10" seems like a big deal! Oh, imagine the possibilities: Framing a picture transferred to fabric, designing intricate circular motifs, creating quilted patterns, and probably more than I can think of!
The projects that have shown up through this Craftsy course are fantastic. I wish I had permission to show them, but you'll just have to follow the link to see. These folks let their imaginations run wild and created visually interesting and useful items. So take a look, enroll in a course, try out those stitches, and discover what you can do today!!!!
If you're a quilter, your mind will probably start to wander toward art quilts. Craftsy has a great class on how to use these stitches for your quilts to create fabulous works of art that are original and beautiful! The class is called Stupendous Stitching and I have recently enrolled in it, as art quilts are on my bucket list. And for the remainder of the day, this class is on sale for $19.99 - $10 off the original price.
I don't get in to hand embroidery much, but I do a lot of machine embroidery using my Brother SE400. The designs for them are fantastic and numerous, but I'm really limited on what I can do with a hoop and a pre-made design. I don't have design software, so I use what I find on the internet - mostly at Embroidery Library or Urban Threads. So the ability to combine stitches and make visual interest in quilts and other items is an attractive option. Janome also has a circular sewing attachment that lets you make these stitches in circular patterns. They even have a video about it. With only a 4" x 4" space available in my hooped embroidery machine, 10" seems like a big deal! Oh, imagine the possibilities: Framing a picture transferred to fabric, designing intricate circular motifs, creating quilted patterns, and probably more than I can think of!
The projects that have shown up through this Craftsy course are fantastic. I wish I had permission to show them, but you'll just have to follow the link to see. These folks let their imaginations run wild and created visually interesting and useful items. So take a look, enroll in a course, try out those stitches, and discover what you can do today!!!!
Sunday, September 16, 2012
The Creative Process (or lack thereof) On Art Quilts
Dear you,
I started a comment game on my Facebook page (http://www.facebook.com/freckledots). Here are the details: So starting right now, continue to comment for a chance to win a custom designed wall quilt from Freckle Dots! This can be a tee shirt quilt or a pattern created original design. This is a $75 value. You'll have to give me some time to finish it, as I have 6 lined up in my commission line right now. You can comment as many times as you like, because the last comment on September 21, 2012 by 12 am will be the winner! Keep the conversation going!
I have been struggling with my "creative process." All of the books I've read say to "start with a drawing" and then use a fabric wall, layouts, samples, etc., etc. before beginning any quilt project. Well, in my business I am usually told, "This is what I want, can you do it?" and my reply is "Yes." Many times I'm given creative license on my commission, so I take it. But I have only ever drawn out one quilt, and it didn't work out the way I wanted it to. I went a completely different route with it and loved it.
My creative process involves seeing an image in my mind, then finding the fabric I want or going with "happy accidents." It also involves me cutting out the squares larger than I think I will need them, then adapting to make them more uniform. But I don't plan. I can't plan. It hurts. ;) Most of my quilts develop as they are made. It makes for frustration occasionally and redesign sometimes, but most of the time they come together quite nicely. I also never settle on a quilt stitch design or pattern until I actually have the top done.
So with that said, why do I beat myself up over the design process? Because all the experts say it should be done one way, and I just don't do it that way. Am I wrong? Not according to one expert. Bozena Wojtaszek from Lodz, Poland was featured in the recent edition (Summer 2012) of Art Quilting Studio magazine. The article "Translating Emotions into Art" was very thought-provoking when it came to her Creative Process section. Wojtaszek says that, "The one thing that is constant (and it always surprises my viewers) is that I don't start with drawing - I can't draw." (Art Quilting Studio, Summer 2012. "Translating Emotions into Art." Pg. 38, My creative process.) Well, now there was a hallelujah moment for me!
Wojtaszek goes on to say that she sketches a plan, but goes through "tons of pictures" and drawings to find elements and then relies on the fabric to go from there. My creative process isn't wrong. It isn't unnatural. It's mine. It works for me. I will also sketch an outline of my quilt and make notes on dimensions, piece sizes, sashing, and more to find what will work to get a good size out of my quilts. Then I look through various stitch designs to find what I love and what will speak best on the quilt. Sometimes it's as simple as an outline, other times it requires a free-motion design.
When I approach my art quilt for the first time, I think I will follow my original process. I will look at pictures that I take, approach it with an open mind and envision what I want. Then I will do an outline sketch with ideas and notes, but I'm not going to stress over it! The quilt will be what it and I want it to be. I don't think any creative process is wrong, as long as it reaches the desired results! IS there a right or a wrong way in art? I think a lot of art snobs will tell you there is, but I concur to disagree. Happy creating.
I started a comment game on my Facebook page (http://www.facebook.com/freckledots). Here are the details: So starting right now, continue to comment for a chance to win a custom designed wall quilt from Freckle Dots! This can be a tee shirt quilt or a pattern created original design. This is a $75 value. You'll have to give me some time to finish it, as I have 6 lined up in my commission line right now. You can comment as many times as you like, because the last comment on September 21, 2012 by 12 am will be the winner! Keep the conversation going!
I have been struggling with my "creative process." All of the books I've read say to "start with a drawing" and then use a fabric wall, layouts, samples, etc., etc. before beginning any quilt project. Well, in my business I am usually told, "This is what I want, can you do it?" and my reply is "Yes." Many times I'm given creative license on my commission, so I take it. But I have only ever drawn out one quilt, and it didn't work out the way I wanted it to. I went a completely different route with it and loved it.
My creative process involves seeing an image in my mind, then finding the fabric I want or going with "happy accidents." It also involves me cutting out the squares larger than I think I will need them, then adapting to make them more uniform. But I don't plan. I can't plan. It hurts. ;) Most of my quilts develop as they are made. It makes for frustration occasionally and redesign sometimes, but most of the time they come together quite nicely. I also never settle on a quilt stitch design or pattern until I actually have the top done.
So with that said, why do I beat myself up over the design process? Because all the experts say it should be done one way, and I just don't do it that way. Am I wrong? Not according to one expert. Bozena Wojtaszek from Lodz, Poland was featured in the recent edition (Summer 2012) of Art Quilting Studio magazine. The article "Translating Emotions into Art" was very thought-provoking when it came to her Creative Process section. Wojtaszek says that, "The one thing that is constant (and it always surprises my viewers) is that I don't start with drawing - I can't draw." (Art Quilting Studio, Summer 2012. "Translating Emotions into Art." Pg. 38, My creative process.) Well, now there was a hallelujah moment for me!
Wojtaszek goes on to say that she sketches a plan, but goes through "tons of pictures" and drawings to find elements and then relies on the fabric to go from there. My creative process isn't wrong. It isn't unnatural. It's mine. It works for me. I will also sketch an outline of my quilt and make notes on dimensions, piece sizes, sashing, and more to find what will work to get a good size out of my quilts. Then I look through various stitch designs to find what I love and what will speak best on the quilt. Sometimes it's as simple as an outline, other times it requires a free-motion design.
 |
| Most recently finished tee shirt quilt |
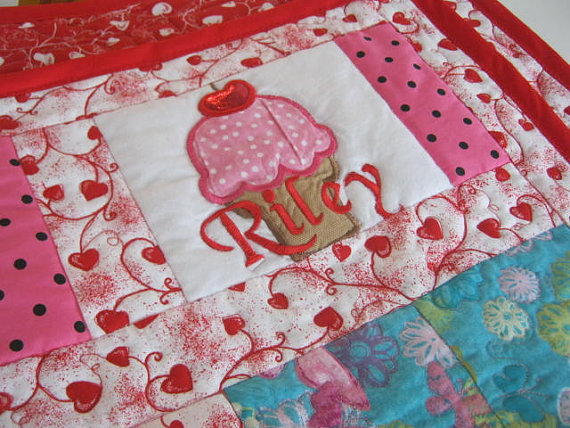 |
| Quilting was dictated by the heart pattern on sashing and outlining of images |
 |
| More examples of outlined images |
When I approach my art quilt for the first time, I think I will follow my original process. I will look at pictures that I take, approach it with an open mind and envision what I want. Then I will do an outline sketch with ideas and notes, but I'm not going to stress over it! The quilt will be what it and I want it to be. I don't think any creative process is wrong, as long as it reaches the desired results! IS there a right or a wrong way in art? I think a lot of art snobs will tell you there is, but I concur to disagree. Happy creating.
Wednesday, August 8, 2012
Ins And Outs of Art Quilts: Painting
So in my continuing quest to figure out this art quilt pursuit, I have looked into painting with thread and actual painting with paint. Many of the quilt pieces that I saw in the art center employed both of these techniques. I will cover thread painting in another post, but for right now I want to explore using the paints. Shiva paint sticks are very popular among quilters and stencilers alike. Other textile paints may be used too.
As coincidence (or fate) would have it, one of my most favorite and inspirational quilters, Leah Day, just uploaded a video using her painting technique. As a side note, if you're looking for a free-motion quilting pattern and just not sure how to pull it off, check out her other videos at http://www.daystyledesigns.com/365project.htm and on You Tube. Check out what Leah does, her adorable little boy, and her really awesome rings:
As coincidence (or fate) would have it, one of my most favorite and inspirational quilters, Leah Day, just uploaded a video using her painting technique. As a side note, if you're looking for a free-motion quilting pattern and just not sure how to pull it off, check out her other videos at http://www.daystyledesigns.com/365project.htm and on You Tube. Check out what Leah does, her adorable little boy, and her really awesome rings:
Monday, August 6, 2012
Ins and Outs of Art Quilts: How to Start?
A few weeks back, I attended a recognition assembly for my daughter AB, who had won an art scholarship to our local Center for the Arts. (No, the apple does not fall far from the tree.) While there and waiting on the procedures to begin, I took note of the display they had featured for the month. Wouldn't you know it, they were art quilts by a local artisan. Enthralled does not begin to signify my immense desire to study, recall, and create something of such immense beauty. The use of mixed media ignite within me a curiosity I had not felt from seeing images of it on the computer or in books. So I started researching a little, the gnawing desire to make one growing more and more intense. However, the immensity of a large art project that may or may not succeed thwarted my initiative to start.
So tonight I stumbled upon the term "mini art quilt." Once again, I was captivated. I have ideas swirling around in my head, books on Amazon that I MUST buy or download, thinking of subscribing to Quilting Arts magazine, and viewing images of these wonderful little quilts. I know I want to start with something small. But one question plagues me: "How do I start?" I'm not what you'd call a traditional artist. I didn't pursue art in grade school, found myself floundering terribly when it came to drawing in interior design classes (that's another story), and have never really been taught the methods of art.
I know how to create, though, and I've always been one to pursue learning. But once again, where do I start? Do I have to have an extensive knowledge of traditional art studies? Or can the creativity come from the heart like any other pursuit I've had? If anyone has any suggestions, I'd appreciate it! The words of a wise and dearly departed lady come to mind, "Just start." That was how she answered my request to learn how to quilt. Of course, I'll be posting this on my beloved Quilts!Quilts!Quilts! forum on Etsy, so I'm sure I'll get a lot of good information there. But in the meantime, if you have suggestions or information, please pass it along.
So tonight I stumbled upon the term "mini art quilt." Once again, I was captivated. I have ideas swirling around in my head, books on Amazon that I MUST buy or download, thinking of subscribing to Quilting Arts magazine, and viewing images of these wonderful little quilts. I know I want to start with something small. But one question plagues me: "How do I start?" I'm not what you'd call a traditional artist. I didn't pursue art in grade school, found myself floundering terribly when it came to drawing in interior design classes (that's another story), and have never really been taught the methods of art.
I know how to create, though, and I've always been one to pursue learning. But once again, where do I start? Do I have to have an extensive knowledge of traditional art studies? Or can the creativity come from the heart like any other pursuit I've had? If anyone has any suggestions, I'd appreciate it! The words of a wise and dearly departed lady come to mind, "Just start." That was how she answered my request to learn how to quilt. Of course, I'll be posting this on my beloved Quilts!Quilts!Quilts! forum on Etsy, so I'm sure I'll get a lot of good information there. But in the meantime, if you have suggestions or information, please pass it along.
Subscribe to:
Posts (Atom)
Craftsy

LinkWithin
