Welcome!

I craft! Spinning, sewing, knitting, quilting...it's all here, along with so much more. I just love making things and writing about them. I hope you'll join me.

Craftsy

Craftsy

Search This Blog

Showing posts with label shabby chic. Show all posts

Tuesday, February 17, 2015

Shabby Chic Recipe Box

A couple of weeks back I posted about wanting to redecorate my home in the Shabby Chic style. I'm still playing around with a few things and doing a little here and there. With my job it's difficult to really throw myself into it like I want. But I have this week off because school is out and I'm getting a few things done here and there.

Yesterday I decided to rearrange my kitchen a bit. I have an old Keurig that I don't use much and a new Hamilton Beach coffee maker that I love and use daily. The new coffee pot was sitting by the microwave and taking up valuable counter space, while the Keurig was sitting unused in a section of the counter by the stove.


Anyway, the process led me to discover that my little cardboard recipe box I've had for about 10 years was in sorry condition. It had grease all over it and the bottom of it had become soaked with some kind of smelly substance I didn't know it had come in contact with. I had to peel off some of the paper covering and also realized that the box was covered in a plastic film. I peeled that off and removed all of the grease. I also popped off the dirty sunflower decal that was on it. While it looked better, it needed more.

I had partially painted it before it occurred to me to take pictures!


I decided it was my next project. The first thing I did was to attach a piece of felt to the bottom of the box where I had to tear off some of the paper covering to remove the yuck. I used a bit of my Loc-tite I'd used on my knob plates to glue it down.


 I took out some of the pretty blue paint we'd used for the kitchen and mixed it with a bit of baking soda to make a chalk paint. After 2 coats of paint and waiting for it to dry, I dug through my collection of scrap book supplies and did a bit of a search on the Graphics Fairy for something kitchen-y. I used a product called Rub-Onz. I really love this stuff and it is very easy to use. It took a few minutes to print my design in reverse, apply the adhesive film, and rub it onto the top of the box
.


I applied some stickers designed for scrapbooking and a strip of ric-rac style paper around the top. It took a couple of hours, but mostly just waiting for the paint to dry thoroughly. I love how it turned out! What do you think?

Graphic on the top

Stickers, graphic, and a beautiful jar of peanut butter. 

Friday, January 16, 2015

Collecting the Shabbiness

Shabby chic is in full blown collection mode. I have scoured Pinterest, made new boards, collected paint samples, planned so many new things to do with the furniture and additions to make, and I went thrift store shopping. Yes, I know, it was very dangerous. But I made it out with less than $50 spent and a really great collection of new projects.

Probably the one I am most happy with and love is the little bunny doll. I don't think she's very old or even vintage, although she was covered with a good bit of dust. But everything from her flowery dress with lace collar, to raffia ears and bows, to her little wooden body and missing basket made me fall in love with her. And for $1.99, how could I say no? She will become a permanent fixture in the sewing room. 

My new bunny
wire cage
My other finds include what I believe to be a plate cover that will become a hanging lampshade, a little wire and stick birdcage that will be filled with mosses and fabric roses, a clock with a Celtic knot (that will probably stay just the way it is, with new hands), a basket for the bathroom, 3 little buckets I'm hoping to make into light shades for the other bathroom, and a hat rack. 
rose lights! For the bedroom


soon to be lampshade with butterfly, basket, and the buckets for lampshades. 
The Celtic Knot Clock. (Please forgive the messiness of my crafting table!)
I love the hat rack almost as much as the bunny. Almost. I plan to paint it and distress it first. Then it will become a plant hanger for the craft room. I love my greenery. 
Hat rack destined to be a plant hanger


Wednesday, January 14, 2015

Cupboard Door Knob Backplate

It's my first legit crafting post of 2015! I have decided that THIS is the year that I will finally decorate in the shabby chic manner that I so love. This means lots of little crochet pieces and a blog filled with shabby stuff. So I hope you're prepared!


The first thing I wanted to do is fix the paint chipping off the cupboard doors behind the knobs in the kitchen. I have looked at many different backplates for this solution, but nothing really struck my fancy. The ones that did were too pricey for the amount I needed, too!


So I decided that I would try to crochet some lace doilies and use those as backplates. The biggest challenge was trying to find a small enough doily pattern to use. I only had about 3" of room. I finally decided to just look at the center of some larger doily patterns and chose Curlique from the book Irish Lace Doilies on e-patternscentral.com. I just made the first 4 rounds, which, as indicated in the pattern, would measure 3" perfectly.


It took me a couple of nights, but I made the first 7 to go on the upper cabinets, where the chipping was the worst. First, I removed the knobs and repainted the chipped areas after a light sanding. After that was dry, I starched my doilies using a 1/2 white glue, 1/2 water ratio and letting them dry after blocking.


Once they were dry I applied them to the cupboards using Loc-tite Crafter's Indoor Safe Adhesive. It is non-yellowing, acid free, and low odor. It also says it is water resistant after curing and creates a permanent bond. This was exactly what I wanted.


So what do you think? I think that crochet can be used in so many different ways. All it takes is a little ingenuity. On my way to glorious shabbiness.


Sunday, January 22, 2012

Junkin' Up My House


Rose Trellis Fountain
Yes, it's true. My beautiful home is filled with junk. Well, other people's junk, anyway. I love thrift and antique stores and my home is beginning to reflect this obsession. I always wanted a home that didn't look so modern (or falling down) that it would really be a canvas for a shabby chic or country look. I'm attracted to things that I can re-purpose or use in ways not originally intended. And I have a hard time finding extreme usefulness in modern-day furniture designs. They leave out utilitarian needs and instead focus only on style. If it were simple enough in my home to focus on style, then I'd be all for it. But the varied interests, needs, and wants of a 7-member family also demands storage, function, and attractiveness. So with these few rules in place, I decided to fill my home with things that make me happy. I mean, why not? Isn't home supposed to be a place you come to when you want to be happy? And filling it with things that don't mean anything doesn't make me happy. So the pieces I'm choosing will most likely also be an eclectic mix of objects, but that's ok, because that suits me.

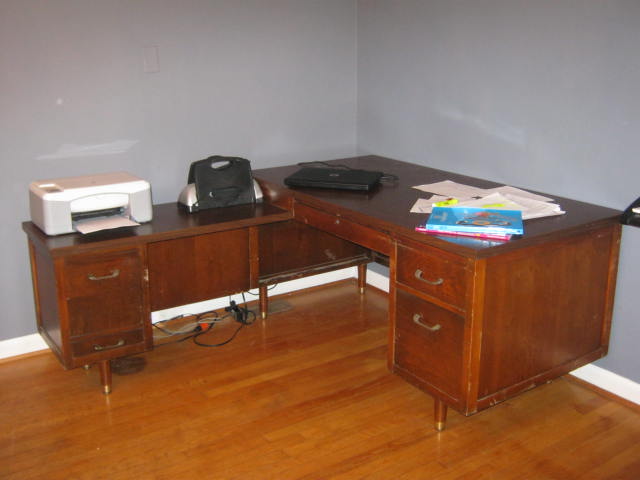
Yesterday my husband and I went thrift store shopping without our children for four entire hours! We found a sitter and went on our mini adventure. We found many things that caught our eye, but we didn't buy it all. Instead we chose some things to go in our fairy garden, a desk for the dining room/office area, and a teapot for our collection. Altogether we spent about $60. Yep, $60, desk included. The desk was at a yard sale, just waiting for us. I'm planning to clean it up, decoupage some scenes on the ends, maybe distress it and add a coat of white paint to it, and change out the handles on it to something a little fancier. It is, after all, in my formal dining room!

My $40 desk
My husband has an idea on how to hook up the fountains using pvc pipe underground, a two-way faucet, and some aquarium tubing. I'll try to take pictures of it when he gets it together.

The little fairy holding the petal bowl will eventually have some miniature roses in it. She will help me tend them. :)

We also started scrounging around the yard and found some old privacy fencing and wood from a building that would be perfect for the garden and for shelving inside the house. So as it all comes together I hope you'll join me in my journey. Your

Rose Garden Fountain

ideas and suggestions are ALWAYS welcome.
A fairy for the garden

Fairy Fountain

Craftsy

Craftsy

LinkWithin

Related Posts Plugin for WordPress, Blogger...