Welcome!

I craft! Spinning, sewing, knitting, quilting...it's all here, along with so much more. I just love making things and writing about them. I hope you'll join me.

Craftsy

Craftsy

Search This Blog

Showing posts with label t-shirt quilt. Show all posts

Monday, September 2, 2013

Creating a T-Shirt Quilt: Part 2

As promised in part 1, here is part 2 of making a t-shirt quilt.

So by now you have all of your prep work done and your tees are ready to be sewn together. As so often happens with stretchy material, it doesn't matter how accurate you THOUGHT your cuts were, there are going to be a few that just don't line up or want to stay at the same size you cut them. The starch helps a bunch but it can and will happen. So now what?

The first thing to do is decide if you want to sew your blocks together in rows or in columns. It doesn't really matter what you choose, because the process of lining them up is the same. For this quilt, I decided to sew in columns.

sewn in columns 


Now when sewing, I tend to always use a 1/4" piecing foot, even for the tees. This gives me better control over the seam allowances. Many will insist that a walking foot is the way to go, but when the tees are starched well, the walking foot does not make a difference in how well the pieces sew together. It's actually more beneficial to have a smooth foot because the starch causes them to be a little slicker than regular knit fabrics that are not starched.

1/4" piecing foot

walking foot


When sewing them together, I try to make sure that at least one side and the edge to be sewn are lined up and the same size. If there is a bit of a difference on the other side, that's ok, because you will trim your columns (rows) before putting them together. Just make sure that you don't end up with a difference of more than 1/8", on one side, because this can really make is so the blocks are not centered. Your smallest block will generally rule the rest. You can usually take fabric off, but it's much harder to add strips and put it back on, so be careful in your prep work and pre-cutting!
sections sewn in columns

Once you have the blocks sewn together in strips, it's time for all the fun to begin. Press the seams on the first strip up or right, the second strip down or left, the third strip up or right, and so on. This will help you to "nest" your seams. Trim your strips so they are nice and even down both sides.
Iron in opposite directions for the nest seams


Now you're going to line up those seams. The seams should look like puzzle pieces and fit together so that they lay flat, without a big bulky are where you have two seams on top of each other. T-shirt material can be kind of thick once it is all seamed together. Quilting over it later can actually break a needle!
Nested Seams

Use a pin to secure the seams. Here is where even with all of your careful cutting you'll understand just how stubborn this type of material can be! Some of those seams won't just fall in place and line up. Now we're going to make "stretch" our friend. We're going with the 1/8" rule again, too. As long as your seams are only off by about 1/8", you can stretch them to meet up. Usually the offset is caused by one tee being a little thicker and starched stiffer than another. Once you've pulled them together, pin them. Your seams should all "nest" nicely without any bulges along the side of the seam.

Small gap. No more than 1/8". Make the stretch work for you!


As you sew and come to those seams, you can remove the pins and pull very gently on either the top or bottom section to nest the four corners. It will have little to no effect on the rest of the section and you can continue sewing. If your material starts to bunch up, form a roll or a tuck, or throws the other joins off, you have stretched too much! Keep it at or under an 1/8" and this won't happen.

Seams nested after a tiny pull 


Once all your sections are joined, iron down the new seams. You can iron these in any direction. I usually go with how the fabric is falling. When you sew across them or along them it won't cause problems because your nested seams have decreased unnecessary bulk.

Nicely nested corners, all lined up neatly! 


Ok. You've finished your quilt top! You're on your way to finishing the whole thing!

No wonky seams and everything lined up without bunches! 


Monday, August 12, 2013

Creating a T-Shirt Quilt: Part 1

There is a ton of information on the web about t-shirt quilts. Some is fairly accurate, some is not. I've been making t-shirt quilts for about 2 years now. I started out not knowing a thing about it really, but ended up making a fairly nice quilt with just a few issues. Along the way I've learned a lot and have narrowed my process down pretty good. After about 18-20 quilts, I do finally have a process! So I thought I'd share my process with you.

Part 1: Prep Work


It's all about the prep work! The actual sewing is fairly quick and the quilting is similar to any other with a few exceptions. But the prep work is what makes or breaks your t-shirt quilt. Yes, you CAN just cut them into squares and sew them together. The problem with doing it this way is that you will not end up with similarly sized squares. T-shirts are made to stretch. This is rule #1 in t-shirt quilting. I reiterate: T-SHIRTS ARE MADE TO STRETCH.

The stretching is what causes a majority of problems. When I first started out making my quilts, I didn't know about interfacing. I just did the cut and sew technique. Big mistake. I had bumps, lumps, stretches, and all kinds of other things that I had to work out in the quilting part. The customer liked it and still raves about it, but I know that it could have been better.

I used flannel for the sashing and backing, which was actually a good choice. 

However, after that quilt I had more orders because everyone loved it. So I figured maybe I should look into how they were made. I found some Amazon eBooks that had good information in them and a lot of online tutorials. Most of them said, "Use lightweight interfacing to reduce the stretch." So that's what I did. Time and time again I put at least $10-15 in each quilt using iron-on interfacing. Not to mention cutting it, ironing it on, and spending at least 1 day getting all of the shirts interfaced. Afterward, they would be kind of stiff to the touch and not really what one would expect from a t-shirt material. So I changed my process. 

It is mentioned in a few circles, on blogs here and there, about using liquid starch for temporary interfacing. And see here where I say "temporary?" That's because when the quilt is all finished, you wash it out and ta-da! you have a soft, comfy feels-like-a-t-shirt-quilt. I posted more info on this technique here

With that all said, here are the first few prep steps to get you started: 

Step 1: Cut 

 I cut off the sleeves inside the seam, cut off the collar below the seam, cut across both shoulders and up both sides. Make sure your tee is flat and if need be, ironed, so that you get accurate cuts. 

Step 2: Soaking

Once the tees are cut, use the liquid starch method to soak the tees. Be careful here, because even though some of the tees are probably many years old, they can and will bleed into the water. I soak whites first, then grays, moving toward brights, then reds, and blacks. If any of your tees bleed into the water, take note of them. Also, DO NOT LEAVE YOUR TEES SITTING TOGETHER WHILE WET. They will bleed into each other. I know this from experience. :( 

Step 3: Drying

Lay out your tees to dry. My husband and I devised a special ceiling mounted drying rack to do this because it allows air flow through the top and bottom. It is also up and out of my way and is adjustable. You can use any type of a flat surface, but again be aware of damage to wooden tops and bleeding. Surfaces can bleed onto your tees, too! 

Step 4: Iron

Once your tees are dried they will be stiff and wrinkled. You will need to iron them. 

Using a warm steam setting (between wool and cotton on my iron) carefully press out the tees from the back. The fronts of your tees often have a plastic-type overlay for the image, which can melt. This is also from experience. Lay a press cloth over the image if you must iron over it. I have found that ironing from the back doesn't seem to cause damage. You can also spritz with water on particularly wrinkled areas. Just don't saturate them and rinse out your starch! 
Starch spots on the tees after ironing

When you are ironing you will probably see spots of starch on your tees. This is okay and doesn't affect the tees in any way. It washes out and is quilted over very easily. Just ignore them. Please. 

Step 5: Cut again 

Now it is finally time to cut your tees to size. I have a makeshift template that I use to cut my tees. 

template. zebra stripes are cool.


I used cardboard from a corrugated box and wrapped it with zebra striped duck tape. It is not 100% accurate, but it gives me a good way to view the image, center if at all possible (not on the shirt above), and draw a chalk line around the edge to give me a general idea of where to cut. I then cut about 1/2" beyond my chalk line and even it all up using my ruler. 

Tees all cut even in nice little piles
If there are tees that don't fit the template because they are too small, I will lay them to the side and add sashing, bits of other tees, or if I have enough make a column or row that is a little smaller than the rest. In the image above you can see where I cut 5.5" squares from the fronts to make a 9 patch square, evening out the number of tees. 

Okay, this post has turned out long enough and by the time you've gotten this far your prep work is finished. I can't stress enough though that t-shirts are made to stretch. This is their nature. It can help you or hinder you. Prep work is everything. In my next post I'll take you through sewing them together, what feet to use and machine settings, and how to get those stretchy suckers all lined up right. Until then, if you have any prep work questions, feel free to ask away in the comments and I'll do my best to answer!


Monday, May 6, 2013

Using Liquid Starch for T-Shirt Quilts

{I originally wrote this post on March 19, the day before my dad passed away. I have not been on here much, as his loss has been a lot for me to bear. Please stay with me as I try to get back into the swing of things.}

In my last post I mentioned that I was now using liquid starch to stabilize my tees prior to cutting and sewing them. It is essential in t-shirt quilting to stabilize the shirts. If they are not stabilized, they WILL stretch and pucker during sewing and quilting. However, the desire for a soft, tee shirt-like quilt is the entire reason for making one! Iron on interfacing leaves the shirts a little stiff. It's not unpleasant or hard to the touch, just a little stiffer. Liquid starch will wash right out of the quilt once it's done. So if you want uber-softness AND stability, liquid starch is the way to go! Another bummer when it comes to iron-on is that it can get quite expensive when considering it sometimes takes 10 or more yards at $2.49/yd to complete one quilt. If the expense isn't enough, there is the time it takes to iron the tees, then iron the stabilizer onto the tees. And you can't just iron it on, you have to use a press cloth and spend about 10 seconds in small section - sometimes over a minute just moving it around, pressing, moving it, pressing - you get the picture. It takes a lot of time!

Here comes the solution with liquid starch. I was a bit skeptical at first as to whether starch would make the tees stiff enough to work with. But it does. So where to get the starch? Of course, you can always go out and buy Sta-Flo or some other bottled liquid starch from the store. But what fun would that be? We're cutting costs here. And time. With a bit of Googling I came across some really great recipes for homemade starch. Pinky Has a Brain is by far my favorite. With a little tweaking I found what I was happy with.

Her recipe calls for 1 T corn starch and 4 cups of water. However, I needed it just a little bit stiffer, so I double the starch. I also needed much more than 4 cups. One full size quilt with 30 tees takes about 48 cups of solution. To quadruple a batch I use 8 T corn starch and 16 cups of water. 15 of them boiling, the rest to mix with the starch.

I cut the tees, place them in the cooled starch solution one by one, squeeze out the starch and lay them flat to dry. I improvised a drying rack to accommodate a large amount of tees. It takes about 1 day for them to dry like this, but I can be finishing up one quilt while the new tees are drying, so it works out! I then take the tees, iron them flat, using a little extra steam if necessary, cut them to size, and voila! I have beautiful even squares that are easy to work with! It's best if you can get your tees to lay really flat so there isn't much ironing to do later on. I've also tried them in the dryer, but I didn't really like the results. They were still a little too stretchy for me.

 Here are two quilts I've completed using this method. I wish you could feel how soft they are. It's really just like snuggling up with your favorite tee shirt. I've been using cotton batting and usually use flannel for the backing to compliment the tees, unless cotton is requested.

This is actually a double-sided full size quilt made using the same process. The starch stabilizer allows for freedom in free motion quilting, makes the tees more stable and taut so there is no bunching, and in the end they wash up so beautifully.


Monday, March 11, 2013

DIY Drying Rack Tutorial

Reading up on t-shirt quilting techniques I realized that there were quite a few people that didn't want to use the interfacing on the backs of the tees, which prevents stretching and makes sewing easier. The tees do take a more rigid feel once backing is applied. Instead of using interfacing, these adventurous souls were using liquid starch. They are dipping the tees into the starch and allowing them to dry, or putting them in the dryer. I was a little skeptical about whether starch would give me the same rigidity required to produce a clean cut and accurate squares, since most of the posts I was reading were not from professional quilters, but those that had decided to try a t-shirt quilt. 

Well, it worked. I decided I didn't like the dryer method, but laying the tees flat to dry DID produce a nice, rigid surface that will wash out once all the quilting is done, creating a softer quilt. 

So where to dry out 20+ tees on a flat surface that would not cause damage to the surface? I needed to make a drying rack. I couldn't have the rack taking up floor space, as my once large crafting room is getting smaller and smaller. It would have to hang from the ceiling. And the surface would be so much better if it wasn't solid but made of a mesh to allow air flow. And big. Even cut to size 20 15" wide tees take up a lot of room! With my husband ingenuity, a little Googling, and a trip to the hardware store, this is what we came up with: 


 It's a little difficult to see the mesh, but it's there! If you'd like to make one too, here is what we used and what we did.

You will need:

24 cup hooks
6 drywall inserts
A drill
7 8' lengths of 3/4" PVC pipe
4 3/4" PVC t-connectors
8 3/4" PVC 90 degree elbows
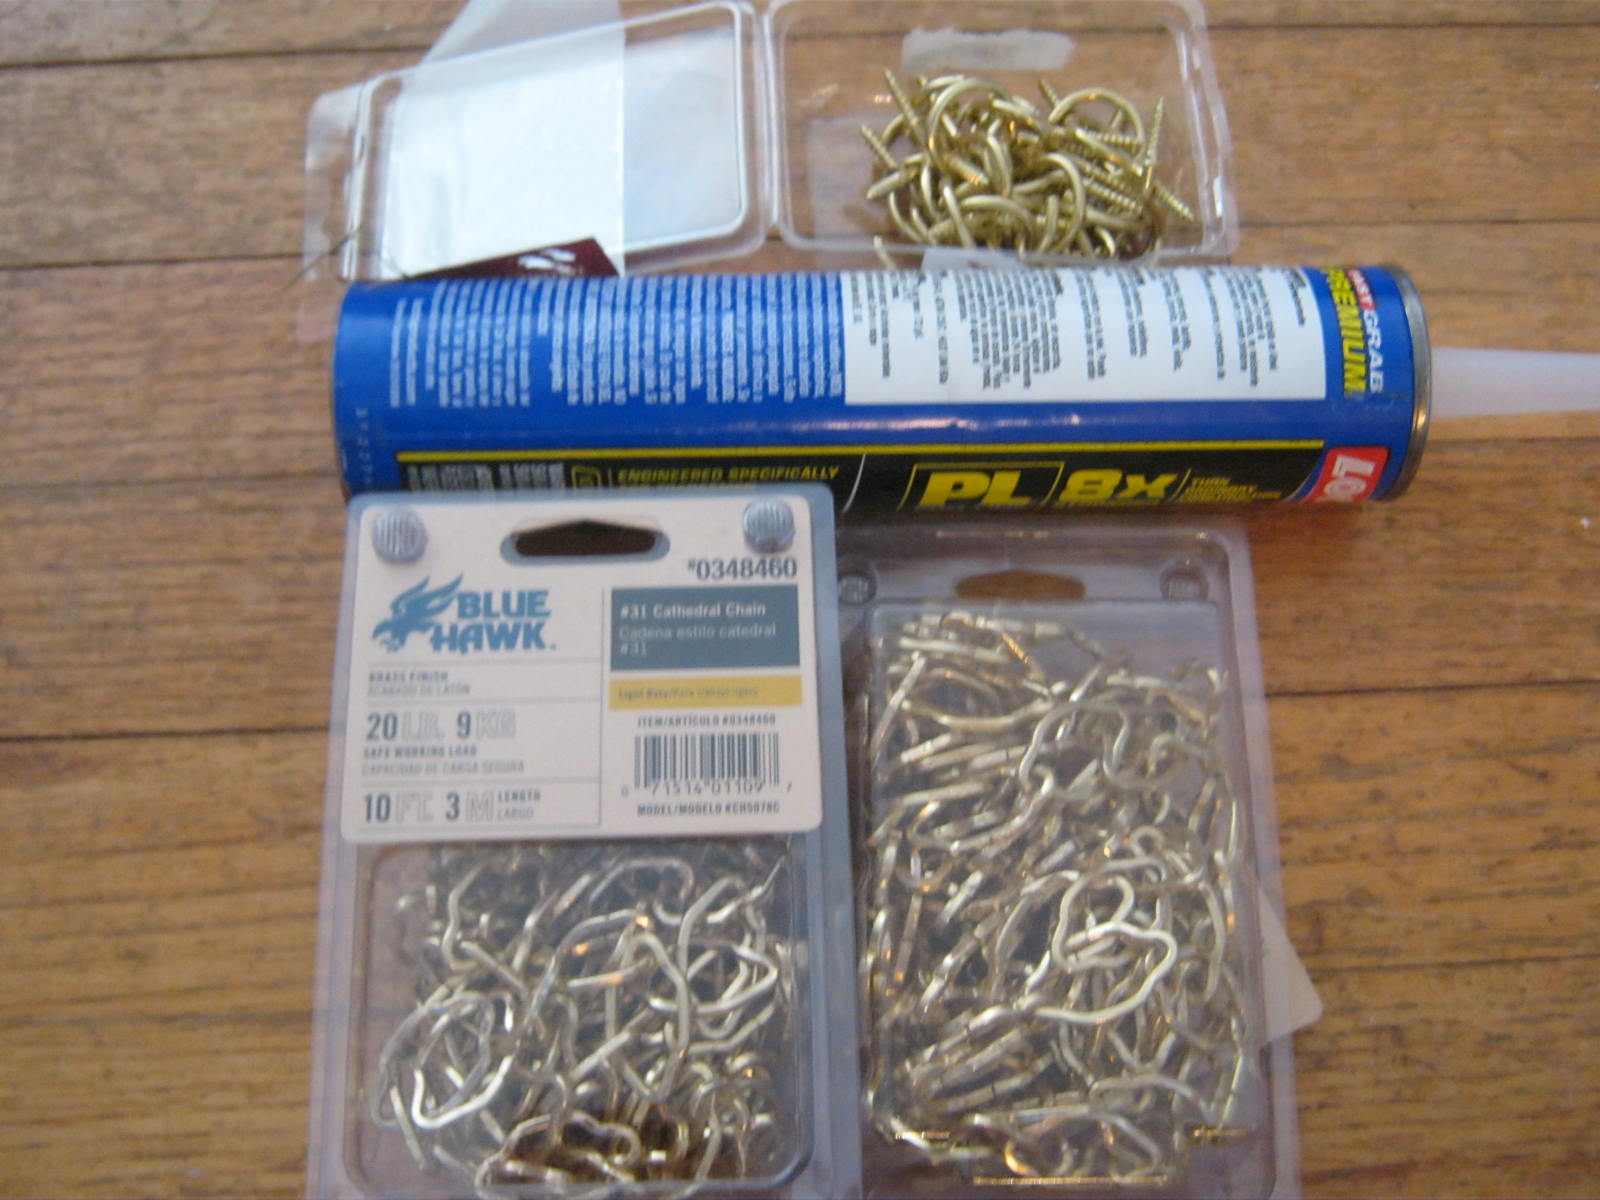
2 boxes of prepackaged chandelier chain (or whatever you prefer as long as you can remove links for easier cutting)
Printed Duck Tape
1 Roll of Wildlife Netting (garden center at our store)

Ignore the tube of silicon. We didn't use it because we used duck tape instead. See directions.


To make:

We cut each of the tubes in half, them put the long sides back together using the T-Connectors. This allowed us to put a brace between each of the long side to stabilize the rack and prevent sagging once the wet tees were put on.


Tees and center supports

We connected the ends using the elbows and the other halves.

Ends and Elbows

My husband then drilled pilot holes in the top and bottom of each elbow and t-join on the top frame, offsetting the holes so that they weren't directly above or below each other, and on the tops of the bottom frame. We then put eye hooks into each of the pilot holes for the chains to hang from and from the ceiling. 

pilot holes
cup hooks
He measured and drilled holes in the ceiling for the remaining cup hooks (which should be six) and put in drywall inserts to prevent them from pulling free of the ceiling. 

It takes a bit of patience and two people, but we hung the racks from the ceiling and from each other using the chains. We measured the chains about 1' long. I wanted it to be adjustable and out of the way when I wasn't using it, so the chains help me to lower and raise it. This doesn't work very well, so I'm researching how to do it differently. However, the rack itself works great! 
hung up
Now for the fun part. This is where the netting and the duck tape come in. We stretched the netting between the sections across the width. To secure the netting, we cut it, then taped down one side with duck tape. We then stretched it taut and used smaller pieces to make sure it was evenly taut and flat. Then we taped it down by taping from the top down to the bottom and wrapping the netting onto the pipe. It worked wonderfully and nothing has come loose or pulled up. Besides, the zebra stripe tape adds a bit of flair and interest to the pipes! 

This would make a terrific clothes drying rack for a laundry room, even on a smaller scale! 

Thursday, November 10, 2011

The End Result

Although it took a while, and a lot of time away from other things, I have finally finished my baby t-shirt quilt! 

This was my 15 minutes of fame on Facebook last night. I'm with a little group that buys and sells locally, and the mother of the child that I made the quilt for posted a picture of this on that group. I've now had about 6 different requests for t-shirt quilts. Now you might see that some of the lettering looks a little off center, but that is due to the way the shirts were cut. They were cut before I received them and I didn't have a lot of seam allowance on them, so I had to improvise. A few were lay in a little sideways. But it all worked out. The sashing and batting are turtles on a green flannel background. It was so soft I wanted to cuddle under it! 

The best part about doing this entire project was the joy and memories that the parents will get out of it. They will be able to pass it on to him and he to his children. To know I was a part of that makes me nearly giddy! 

If you would like to contact me regarding making a t-shirt quilt, just email me and we'll talk! Now I'm off to do some more cutting and planning, since I have 2 more on the roster right now. I never really thought of myself as a "quilter", but sometimes the best things to happen to us are not the things we plan. 

Craftsy

Craftsy

LinkWithin

Related Posts Plugin for WordPress, Blogger...