Welcome!

I craft! Spinning, sewing, knitting, quilting...it's all here, along with so much more. I just love making things and writing about them. I hope you'll join me.

Craftsy

Craftsy

Search This Blog

Showing posts with label skill builder. Show all posts

Thursday, March 20, 2014

Sewing on Thursday: Sewing Skill Builder Part 3

For part 3 of our sewing skill builder, we're going to make 2 additional pockets for our sewing basket. These pockets will be the couching sampler and the puffing sampler. Samplers 1 & 2 can be found here.

Puffing sampler on left, couching sampler on right

Materials for puffing sampler: 
1 piece of copy paper
1 - 5"x 8" piece of fabric
1 - small scrap contrasting color for ribbon center
1 - flower or design of choice iron-on applique (sew on work too)
1 - 1"w x 45"l strip of fabric
1 - piece of newsprint or lightweight tearaway stabilizer
1 - yard Belgian lace, ribbon, or cording

We will begin with the puffing sampler. To start, you will need to draw a 5"x 8" rectangle on a piece of paper. Regular copy paper will work just fine. 


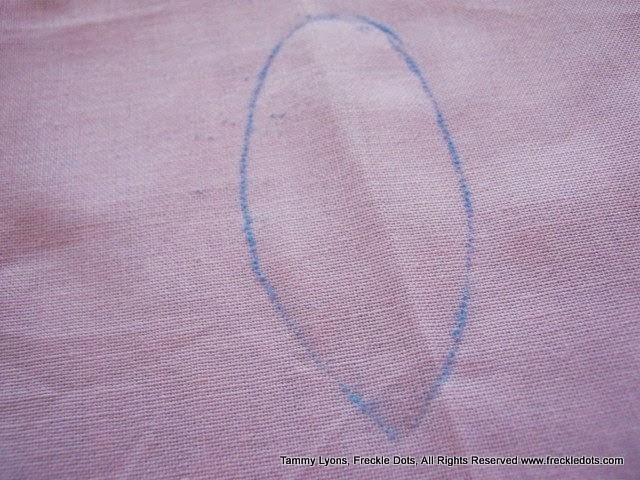
Draw cross hairs across the center length and width of the rectangle. The book instructs us somewhat vaguely to "Refer to photograph on page 6 for pocket design. Draw and cut from paper the shape to be puffed." Which is probably why not a lot of people pick up these older books. They are too assuming that you know what they are talking about! The shape they reference is the upside down "awareness ribbon" (that's my name for it). Start by centering and drawing a teardrop shape in the middle of the cross hairs.


Center your flower applique on the middle of the teardrop to make sure there is plenty of space.


Finish drawing the ribbon shape by making sure that your ribbon width is no more than 1" wide. I actually drew mine around 7/8" to accommodate the fabric strip we'll attach later. Cut out your shape. 


Pin the shape to your 5" x 8" background fabric, in my case the yellow with white polka dots, and using a water soluble marker or a Chaco pen, trace around the outline of the shape, including the middle. 


Remove the pattern and place it on your contrasting color of fabric. Draw the center of the shape ONLY on the contrasting fabric. 

Cut around the shape at least 1/4" larger than your marked lines. 


Pin your teardrop shape to the center of the 5x8 fabric, using the outline of the shape you drew as a guide. Baste it to the background fabric using a long stitch. This helps make sure it stays in place! Then iron (or sew) your applique to the center of your shape. 


Do a final zigzag stitch around the entire tear drop shape to secure it in place and seal the edges. 


Now we're going to work on the actual puffing piece. Draw another copy of you shape onto a new piece of paper. I found that copy paper does not tear off very well and that it is good idea to use lighter weight paper like newsprint or a thin tearaway stabilizer for this part. Do not cut the shape from the paper. 

Gather the 1" x 45" strip of fabric by using a basting stitch and sewing down both long sides of the piece. Tie the thread ends on one short end and carefully pull the bobbin threads on the opposite end so that the fabric starts to bunch up on itself. Continue to bunch and move fabric toward the tied end, until it is as bunched as you want it. 


Arrange your puffed piece on the outline of the second shape you drew. You can adjust the gathers to fit the shape. Once you have it where you want it, pin it in place. 


 Baste the piece right to the paper or stabilizer. Make sure it is where you want it, then zigzag stitch around all of the edges. Remove the paper from the puffing piece. If you use a tearaway stabilizer you can leave the section behind the fabric attached. I left my copy paper on, although I think it was much too stiff afterward.

Pin and baste your puffing piece to your 5" x 8" background fabric. Zigzag around the edges. It is okay to sew over where it crosses.


The book suggests using Belgian lace to cover the zigzagged edges. I couldn't find any I really liked, though, so I used a strip of satin ribbon instead. I pinned the ribbon in place, covering the stitches, then sewed along the inside and outside edges of the ribbon. Mine was 1/4" ribbon. You could probably go 3/8"without encroaching on your applique. 


Couching Sampler Materials: 
1 - 5" x 8" piece of background fabric (dots again!) 
1 - piece of tear away stabilizer
 cording, ribbon, thread, and materials of different thicknesses
1 - thread colors of your choice

On your piece of background fabric, mark diagonal lines in both directions. Vary the distances between your lines. 


Place your stabilizer under your fabric and lay a piece of selected cording over one of the lines that you drew. Using a zigzag stitch, center your presser foot on the cording and sew over it. You can adjust your zigzag width to accommodate the thickness of the cording (usually). 

Continue sewing different cords, ribbons, and threads across your lines, adjusting your zigzag stitches as necessary. I used some metallic cording, pink cording, and doubled-up pieces of embroidery thread. 


Trim the edges of your cording so that it is even with the edges of your swatch. 


I hope you got some good hints and tips during this session. If you missed any of the previous sessions please click the link in the sidebar for Thursdays. You'll see them all lined up there! 


Thursday, February 27, 2014

Sewing on Thursday: Sewing Skill Builder 2

Sorry about the delay in our "weekly" sewing skill builder. Circumstances beyond my control have made posting difficult the last couple of weeks! To make up for it, we'll do two a week starting next week so we're not too far behind. So without further delay,  let's dig right in and get started on this week's skill builder!

We're working on our openwork sampler this week. This sampler employs some age-old techniques of removing part of the weave in the fabric to open up the other fibers running in the opposite direction. It takes a good piece of open weave fabric to work with, but it can make some lovely results.

Materials: 
Make sure your open weave fabric
has obvious warp and weft threads you can remove

  • 5" Square of loosely woven fabric
  • Red thread (or color of your choice)
  • 1 - 5x8" piece of fabric
  • 1 - 2x5" piece of fabric
  • seam ripper
  • stabilizing paper


Cut a 5" square of your loosely woven fabric and mark a 1.25" horizontal band in the center. I did this by first finding my center, then marking 5/8" on either side of that. Pull out a thread at the top and bottom of the band. Here you can see where I used a seam ripper to loosen the threads along the marks.
Loosen the threads using a seam ripper or similar object

Sew along the lines where you loosened the two threads. Now pull out all horizontal threads between the stitched lines.


Sew along the loosened thread lines
Using a narrow zig-zag stitch (practiced in our first skill-builder) and lowering your feed dogs, sew along the vertical lines that are left. Pull some together, adding in and removing sections as you go. You can move from top to bottom and bottom to top to get your variations. (Just a note here, I forgot to lower my feed dogs until I had sewn the entire thing. I went back over it and lowering the feed dogs makes it much easier.) If you don't know how to lower them in your machine, please consult your owner's manual. On the Janome, there is a switch on the right-hand side that lets you easily lower them. You may also want to use a foot such as the "F" foot on the Janome that easily glides over the fabric but also allows for a zig zag.


Sew over vertical threads

First pass with feed dogs up
Second pass with feed dogs lowered 
 Once you have completed sewing the cords on the band, place a piece of paper behind the open area. I used freezer paper and ironed it to the fabric. Zig zag stitch across the top and bottom of your open area band and remove the paper.
Back of openwork with paper removed
 Trim 3/4" off the top and bottom of your openwork and then turn under 1/4" on the top and bottom. Place openwork piece 1" from bottom of 5x8" piece of fabric and stitch along the top and bottom of openwork piece where you turned the seams under.


Carefully cut out main fabric from behind the openwork fabric. Place the 2x5" piece of red fabric underneath the band area with the right side facing up. Pin and topstitch along the fold lines of the openwork piece.
Finished piece with contrasting fabric behind openwork
My openwork ended up a little wonky, but I'm not too worried about it because it will be cut and shaped when we finish the pockets anyway. Remember, these are practice samplers and you can change them up or use them however you want. 

Thursday, February 6, 2014

Sewing On Thursday: Sewing Skill Builder Part One

This week also starts our sewing skill builder! Yep, that's right. We have a Block of the Month and a sewing skill builder. I've been pretty busy at the machine. Not to mention, I also have 2 quilts in the works!

Ok, so part one!

This first bit is actually pretty easy, but it will give you a chance to play with your machine's zig zag settings a bit. I think this is a function modern sewists sometimes take for granted, but the zig zag function wasn't available until Helen Augusta Blanchard patented it in 1873, 27 years after the sewing machine's first patent by Elias Howe. It wasn't really common to have a machine that could both zig zag stitch and straight stitch until the early 1900s. Even then it took a special gadget to perform the function. Today's machines are electronically or mechanically equipped with a zig zag function built in.

Therefore, behold the zig zag!

Materials:

One 7x12" piece of fabric
Thread
Stabilizer, freezer paper or piece of copy paper

For my sampler I chose shades of yellow and pink. I'm not big on off-white, but think the fabrics I chose have a vintage flavor to them.

Since I changed out the colors of the fabrics, I also wrote a little sticky note to myself on the book with the colors I'm using in exchange. .


So for our zig zag sampler, you may want to iron on a piece of lightweight removable stabilizer or freezer paper or put a piece of typing paper behind it. This helps to keep the fabric from bunching up. I used freezer paper because it irons on easily and peels right back off.

Keep the long side to the top and sew the zig zags spaced evenly apart, but leave enough room to run a line of straight stitching between them. Vary your zig zag widths, but try to leave the stitching distance about the same. We want a nice close line of satin stitching.


Once you have sewn your stitches, take the fabric over to the cutting mat and cut a 2" strip off of both sides. Your center piece should be about 2.75" wide. Take the center strip and turn it upside down.

cut 2" off sides

turn middle section upside down


Sew your sides back on to the center strip.


You now have the front of your first pocket piece. In later sessions we'll be shaping and sewing them all onto a backing and actually making the pockets.

Next week we'll discuss making an openwork sampler pocket. For this you'll need a piece of loose weave fabric along with your other fabrics. I used a piece of burlap, but you can choose something else, as long as it has a loose weave where you can pull threads from. Until then, happy stitching! 

Craftsy

Craftsy

LinkWithin

Related Posts Plugin for WordPress, Blogger...