Welcome!

I craft! Spinning, sewing, knitting, quilting...it's all here, along with so much more. I just love making things and writing about them. I hope you'll join me.

Craftsy

Craftsy

Search This Blog

Showing posts with label knit. Show all posts

Friday, January 24, 2014

Friday Tutorial: Knitting Two Hats at a Time, Part 2

 Last week we left off on finishing up our ribbing for the brim of our hats. We discussed how to cast on to four double pointed needles using two different yarns and how to keep the stitches divided so that we end up with two separate pieces of fabric. This week we're going to take a look at how to make stockinette stitch so we can work on the body of the hats.

Stockinette simply means that we knit every stitch on every row. To do this with our two yarns in double knitting, we will have to bring the front yarn forward and backward, but leave the back yarn in the back. The difference is that we no longer have to worry about moving the back yarn to the front.

Now, this CAN be done without moving either if the yarns and working a reverse stockinette in front (purl every front stitch) and a regular stockinette in back. However, when I did this with my first pair of two-at-a-time socks, I ended up with horrible ladders where the joins were. This method seems to work better.

Following Rachel's pattern, we start knitting in stockinette for the body. To begin, make sure both yarns are to the back and you are starting with your front color (blue in my case) to make a knit stitch.


Make the knit stitch, then move the front yarn to the front of the work.

Make the second knit stitch with the alternate color (orange).


Now move the first color to the back of the work to make the third stitch. Continue in this manner until you have knit you're hat to the length specified for the body before making the decreases.
Knit in stockinette the hat starts to take shape

For part 3 next week we will finish the hat by learning how to decrease the stitches for the top of the hat. 

Tuesday, January 21, 2014

Tuesday Needlework: The difference between crochet and knitting

Have you ever been quietly enjoying your coffee (tea, latte, frappe, insert beverage here) in your favorite coffee shop while working on your current crochet project, dressed in your awesome asymmetrical cardigan and slouchy hat (that YOU made, btw) only to have some person obviously uneducated in needle arts come up and ask you, "What are you knitting?"

As the hair on the back of your neck raises and you feel your blood start to boil, you ever-so-patiently take a sip of your beverage with the cozy on it that YOU crocheted, look up and say, "I'm not knitting. It's crochet." And inside your head you're thinking, "If it was knitting I'd have two needles to jab you with." Yeah, don't act like you've never thought this a time or two. 

I pursue both knitting and crochet because I find they have their purposes for different items. I don't necessarily like to make clothing such as sweaters from crochet, but that it is great for scarves and hats.It is too bulky for my taste preferences.
Crochet stitches for a hat

Knit stitches for a hat

I have made cardigans and such, but as for sweaters, gloves, and socks I just think the stitches are too big and it looks too "homemade." Before you string me up, remember, this is just what I feel about it and that I have nothing against homemade. I think knitting has a smoother look and the closer stitches make for a much more appealing fabric for clothing. 

However, if you want something done faster, your best choice is crochet. I can work up a crochet piece in half the time it takes me to knit something. This is also because the stitches work up about twice the size of a knit stitch. I think it may have a lot to do with only using one hook as opposed to two needles, too. 

So what is the major difference? Well, if you do one or the other you probably already know the answer to this. I'm hoping to reach out and educate those that may not know, and hopefully one day the world will be a much better place when the two are not confused, inciting violence in the mind of an otherwise peaceful needleworker. 

If you take the time to notice, crochet is performed using a single needle with a hook on the end of it. The crocheter is usually in a very rhythmic trance with yarn in one hand and a hook in the other. Knitting uses TWO needles. These needles DO NOT have hooks on the end of them, but are rather sharp and pointy. The knitter will also have a rhythm down but it will not be the same as the crocheter's.


Interrupting a crocheter usually means you will interrupt their counting. This is not a good thing. If they sigh audibly and visibly start counting stitches with a louder voice (not the voice inside their head) you had better back away slowly and never, ever speak to them again. To repeatedly ask questions is not wise. 

The same could be said for a knitter, except that for some reason they have a tendency to use stitch markers more often and once they are sure of their stitch count, rarely have to repeat counting. This is not a guarantee, though. Ask yourself, "Do I really want to mess with or upset someone that can use sharp, pointy objects with obvious skill and grace and how much does she/he really value that yarn they are using? Would they mind a bit of blood?" 

If you feel you MUST talk to the knitter or crocheter while they are working, it is best if you sit patiently and watch them work. You may pick up a thing or two in the process. When they stop their hand movements to take a sip of their beverage, it is probably safe to talk to them. Hopefully you are intelligently armed with the correct question of, "What are you knitting/crocheting?" If you get it right, the needleworker is usually more than happy to speak with you about their project. 

I hope this has reached someone in time to avoid serious injury. If, however, you are sitting in a hospital bed with puncture wounds and reading this, I hope that at your next encounter you will be better informed. Cheers, and quick healing...


Friday, January 17, 2014

Friday Tutorial: Knitting Two Hats at a Time, Part One

 Remember in Tuesday's knitting post that I promised a tutorial for knitting two hats on a set of double point needless? Here it is! I didn't want to do socks because there are a couple of tutorials and classes out there, the ones I'm familiar with were listed in the last post. But me and my self thought that since we had already done socks, a hat would be a breeze. No short rows for one thing! What is amazing about knitting these two at a time is that you can make a multitude of things using this method. I'm anticipating working some sweater sleeves for one thing. No more single sleeve sweaters!

I'm using a very simple hat pattern from Ravelry by Rachel Sonntag called  Simple Beginner Toddler Hat. It's a basic ribbed brim and stockinette stitch in a worsted weight yearn. If you'd like to follow along with this pattern, please check out her link and download it for free from Ravelry.

Materials:

Pattern Simple Beginner Toddler Hat
4 oz worsted weight yarn in 2 contrasting colors
Size 6 dpns (or size needed to obtain gauge)
Size 6 knitting needle at least 10" long
stitch markers

Ok, once you have your pattern downloaded it is important to note the gauge. Her pattern calls for size 6 dpns and circulars. We're using 4 or 5 dpns only because it more closely relates to doing the socks later. However, you can also use this method on a circular needle. I knit loosely, so I always drop a size down. When knitting two at a time, your stitches are spaced further apart than normal too. So it is a good idea to go down one or two sizes to match the gauge. I'll be using 5 size 4 dpns.

Casting On


Cast on the required number of stitches for your chosen size. I do this using the super stretchy method for the ribbing (follow link for YouTube video). I cast on to 4 of my 5 needles. When I do this I just work one or two stitches more than I need on the first needle and slip them to the next one so I'm not concerned with making a new stitch.


For example, each of my needles will have 22 stitches for a grand total of 88. I cast 24 on to the first needle, slip 2 to the new needle, and work 22 more, slipping 2, k 22, sl 2, k20. Then join.


Now for the fun part! Knit one round in ribbing. Just like a normal hat. Then when you reach the next round, we join our new yarn and second color.
Joining the new yarn requires that you first cast on the total number of stitches (88 in this case) to a longer straight needle the same size as what you are knitting with.

Long straight needle with 88 stitches cast on
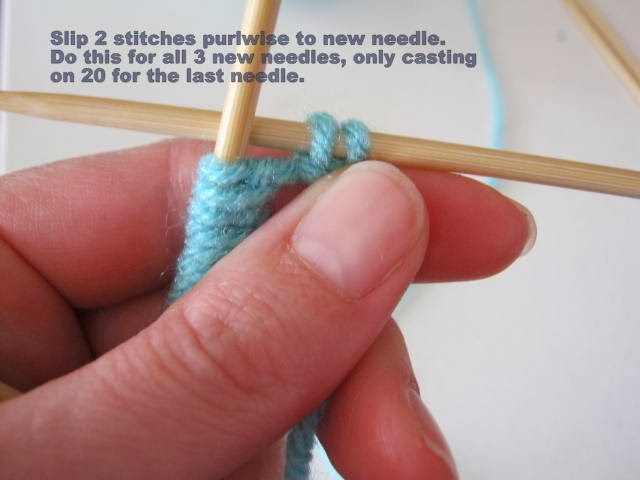
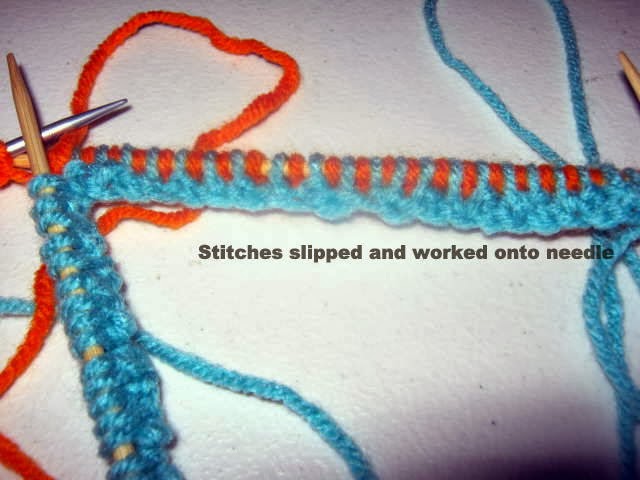
Now, holding the straight needle in back of your first dpn, slip the first stitch from your dpn purl wise. Then, knit 1 stitch from the straight needle. Slip the next stitch purl wise from the dpn (blue) and purl the next stitch. Remember to move your working yarn (orange) back to the back of your work before slipping the next (blue) stitch.


You'll only be working with 1 thread from the straight stitches. In essence, what you are doing is knitting the first row of the second color while placing the stitches onto the dpns. This works much better than trying to cast on each color initially. You're also working in k1, p1 ribbing to match the ribbing on the first row of the first color. Continue to slip stitches from the front row (blue) and working k1, p1 from the back row (orange) until all of the stitches have been worked.

Whew! That's a lot of stitching! If you've made it this far, congratulations. You've cast on your stitches and you're ready to begin the yarn acrobatics of double knitting 2 at a time.


Knitting the Ribbing

For the next part we are going to work with 2 strands of yarn. Your fingers will need some training. I like to hold my yarns with my pointer finger between the two strands, working forward and backward as required. I've tried one of those finger things for stranding and they just didn't work for me. They may for you, though. This is difficult, so don't lose patience. Just keep trying different methods until you find what works for you. 


For row 2, you will hold both strands of yarn to the back because you are working a knit stitch. With your strands separated, knit the first stitch from needle 1 (blue).


Move the blue strand to the front of the work. Knit the next stitch (orange), but keep the yarn to the back.


This should read "Keep yarn forward, knit next orange stitch" 


Purl the next blue stitch and leave your yarn in front as if to purl.


Pull the orange yarn to the front of the work and make your purl stitch. Then move both yarns back to the back. After four stitches you will be in the same position that you started in, with both yarns to the back of the work and ready to make a knit stitch with the first color. 

You will continue to do this until your piece measures what is stated in the pattern. 


I'm going to leave the remaining part of this tutorial for next week. Work on the ribbing, don't get frustrated, and remember that a good cup of coffee is a great cure for aggravation. If you have any questions, feel free to leave them in the comments. You can also find my pattern notes and project on Ravelry

Tuesday, January 14, 2014

Knitting Two Socks at a Time

A couple of posts ago I wrote about the resurgence of old techniques such as tatting, and how some techniques seem to catch on for a while then die away again. I have another one to share with you that some may find very interesting.

I'm sure you've heard of magic loop socks. These are knit on the a long circular needle. You knit one sock, and then the other on a second pass. So with this method, you ARE knitting two at a time, but still knitting them separately on one needle. So for every one row that you do, you still have to repeat the row a second time on the other sock.

 The method I'm discussing is not the Magic Loop. This is a Double Knit method using double point needles and literally knitting one sock inside of the other at the same time. The Annie's Catalog class "Magic Socks" teaches how to use the same method on a long circular needle in the magic loop style. However, I don't own a good pair of circulars with a long enough and flexible enough cable. So for me, the dpns seemed like the best fit!

So what is this exactly?

Well, if you've ever tried double knitting, you've come half way to doing two socks at a time! Double knitting is a process that uses two strands of yarn on double pointed needles. The yarns are worked together and produce a thick, double-layered fabric that can also be used to show mirror images on either side. Here is a really good example on Ravelry by Heather Zoppetti that would make for excellent practice if you so desired.

Now that that's out of the way, let's discuss how we knit 2 socks without having them stuck together. The concept is pretty much that you are going to knit using 2 strands of yarn that are never crossed over each other. To do this, you have to knit one strand in the front by bringing the yarn to the back, then separating the yarns and bringing the front yarn to the front as if to purl, making the knit stitch in the back with the second yarn, then bringing the front yarn back again to make the next stitch. What you end up with is 2 separate socks, knit at the same time, with two yarns. Confusing? 

I thought so at first, too. But I can't confess to having only used one method. I also used the method by Kory Stamper in her article on Knitty to work out the kinks. I have included a bunch of notes in my Ravelry project for the changes that I made and why. But I DID succeed in making 4 socks. The images below only show one pair, because my daughter scarfed up the other ones and I can't find them right now. Kids...


As I was knitting these socks, I thought to myself, "Self, I bet we could knit just about anything tubular using this method." So self and I decided that we would try it! We knit 2 slouchy button hats (also a great Ravelry pattern!) using 2 different colors. Since I also knit hats for charity, I was ecstatic with the thought that I could knit one for personal use (see daughter below? She took the orange one and then other daughter has successfully taken the brown one) and give one away. While that idea only works if you don't have daughters that like hats, it is an excellent one. This same technique can also be used for knitting two sleeves, two boot cuffs, two pot holders...you get the picture. They don't have to be tubular either, as in the case of the pot holders.

I would not suggest using this technique for cabling, unless you have the patience of Job. Knitting two stitches together involves moving stitches around on the needles. It can be a bit tedious. I'll probably try it one day. Just to do it. And say I did.


Since there are a couple of tutorials on the socks that I mentioned in this post, I will be posting a tutorial Friday on making the hats. I'll be using a baby hat pattern and worsted weight yarn for a speedier finish than the dk and sock weights I used previously. The tutorials will be in 2-3 sections, depending on what I can cover. So stay tuned, and check back for more!

Saturday, June 22, 2013

Knit Tester Wanted!

I have just put the finishing touches on my first ever knitting pattern! It is a pair of fingerless gloves with cables and bobbles in the cuff and lace leaves on the back. They are knit in Knit Picks Palette Yarn (100% Peruvian Highland Wool) Lichen fingering weight yarn. I am looking for pattern testers!

 My ideal pattern tester will have experience in knitting gloves (in the round on DPNs). Testers should also have experience in lace, bobbles, and cables, be able to make (helpful, nice) comments using Google Docs (Drive), knit both gloves (as left and right are knit differently), and upload finished pictures of items. I would like to have them tested within a week so that I can make adjustments and changes if necessary before publishing. These are knit for fairly small hands, (I wear a size 5 ring on my ring finger!) so either fit them on a child or make adjustments using a larger needle to fit your hand if bigger.
 The pattern will be in PDF format with sharing on Google Docs allowed. It is also written out and charted. You will be given one free pattern, not be resold or shared in any manner, and send me examples or links of similar items you have created. (Ravelry accounts are completely acceptable!) I would also request permission to use your images on the published pattern to give examples of the finished product.

If you are interested in testing this pattern, please contact me via email freckledotsquilts at gmail.com. Thanks!

Friday, June 7, 2013

Knit in Public Week

It's time to knit out loud! June 8-16 is Knit in Public Week. We're encouraging all of our crafty friends that love to knit (or crochet!) to get out there and knit in public. Tell people what you're doing, share your craft, and invite questions. Sure, you may be counting, but if someone is interested enough to ask questions, write down your count and answer them. They may be joining you one day. Knitting is one of those crafts that draw people in and get them hooked when the discover the possibilities. Little kids' eyes will grow huge when they see someone using 4 (or more) needles to knit in the round. To them, all those spiky rods are cool!

So come on, don't be a prude. Gather your knitting friends, hit the local coffee shop, fast food resty, book store, park - wherever, whenever - and knit out loud!


Thursday, January 17, 2013

Knooking Up

If you've been in the webiverse lately and follow anything to do with knitting, you've probably heard of knooking. It's not a craft that I would say has taken the world by storm, but it has sparked some interest among knit and crochet enthusiasts. I'm not sure who invented knooking, but it was originally published by
 Leisure Arts. Basically, knooking is a technique by which you use a crochet hook with a point end that has a hole in it. That hole holds a piece of string and helps to carry the stitches that are picked up along the starting chain of the piece. The technique produces a piece that has actual knit and purl stitches, just like in knitting, but with only one hook.

I sat down to try this out last night. I encountered a few problems - mostly due to already knowing how to crochet and having to get over the mindset that I was crocheting because I had a hook. The second problem was that I was making a hat in the round. This means that my holding cord was sometimes sitting on two rows at a time and making the piece bunch. I would need to stop, pull some of it out, and lengthen the knitting back out. Other than that the going is kind of slow because I'm still training my hands. Once I get the hang of it I'm sure it will be faster.

Overall, I think it would be a process that could come in handy; especially for beginners that would like to make knit objects but have problems manipulating both needles. I enjoy picking up new techniques and getting started cost me about $20. Ten for the needles and ten for a hat pattern book I wanted. You can also buy a large set of the hooks for thinner and thicker yarns for $20 from Leisure Arts. I am hoping fervently that more patterns appear for knooking, but I also think that ANY knit pattern can be adapted to the knook technique. Bigger projects require a longer holding yarn. I may even write some myself. :)

Monday, January 16, 2012

A step in the right direction

When I really began crocheting in earnest, I started collecting yarn and patterns. At first, it was an innocent hobby. I discovered new yarns that weren't available in my local store. I had to have them, touch them, use them. I went yarn crazy. The patterns became organized on CDs and in filing cabinets. Then the pamphlets required binders with clear pockets to keep them organized. Eventually I had enough of these and books to fill up a bookcase. That was just the beginning.

Being a dedicated Eclectic, I found interest in other crafts. Knitting still required yarn, but new notions, needles, patterns, and books were also in order. Then came some sewing projects. These required fabrics. Yummy, delicious, colorful materials in solids, prints, and patterns that just needed one or two other matching fabrics. And of course, there are ribbons, rick-rack, pins, needles, bobbins, thread...books... you see where this is going.

Quilting required even more books and fabrics and a recent acquisition of said products from another crazy quilter left me with boxes filled and no place to put these wonderful treasures. Of course, I also didn't want to get rid of any of it. This is a sickness that crafters share, creating an idyllic world where they have all supplies on hand so they may continue to craft until they drop.

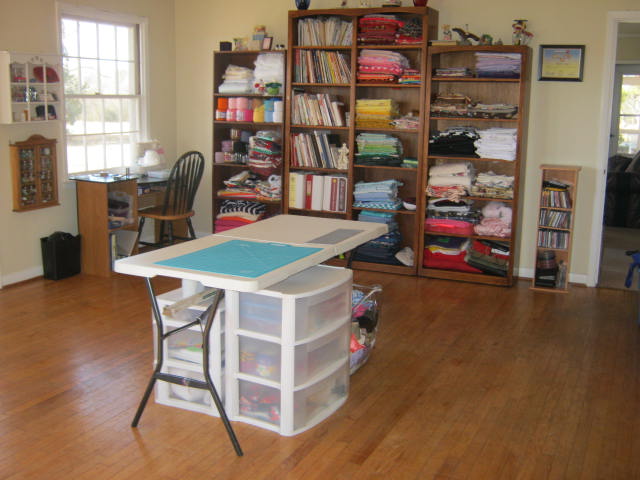
Our recent move not only lifted my heart and spirits, but it also gave me a craft area separate from my sleeping area. An entire room, dedicated to what I love. So after putting away the requisite things in the kitchen, living room, bedroom and bathroom, I got to unpack my sewing room. And I decided that now was the time to organize! It's been more than a week, and I'm almost done. But the rewards are decidedly worth the time and effort. Here is a sample of the fabric shelves:


I have also sorted through all of my sewing notions, eliminated two of the peg boards that were major eyesores, replacing them with storage containers in a cleaned out sewing desk. I do still have one peg board, but that has gone down from the 3 that I previously had that never really worked. 


The sewing machine, jewelry desk (yes, another obsession), and cutting table all have their little areas. I even have room to add a quilting rack if I ever decide that I want to hand quilt. 


I can't wait to get in and finish a couple of quilts and work on some other projects. I haven't even been to my local Hobby Lobby in the last few weeks; probably because of the move, the unpacking, and organizing, but it still counts. Of course, I have the garden coming up in a couple of months, and I'm collecting for that, so I may need some more bookshelves for the books. But we'll take this one step at  a time. :)

Friday, May 28, 2010

IKnitQuiltSew - HAF Blog Ring Feature

Being a knitter, sewer, and crocheter myself, I can recognize talent when I see it. This week's featured artisan is IKnitQuiltSew from Handmade Artist's Forum. Her talent is immediately recognizable in her work. While browsing her studio on Etsy, I was so impressed by the arrangement first of all. Her baby items are arranged so attractively by color, so it is not hard to find matching sets for your little one!


Secondly, she gives you these adorable little baby dolls and teddy bears that are practically irresistable.


My babies are growing up and out of the teddy bear and doll baby stages, but they are so great I might just get one for myself. Where I really fell in love, though, was with her Baby Quilt/Wall Hanging. Quilting is a time-consuming, labor intensive act of love, of which I have done once in my life! I know why they are so expensive, but I have never been drawn to one enough to say that I would buy one. HOWEVER... this quilt spoke to my heart.

Welcome Home Quilt
Notice the details


When that happens, I start thinking how will I get the money for this??? It's not really that expensive, though. Only $150 for this beauty. But with my 5 kiddos I have to carefully gauge each and every dime. This quilt, though, echoes the desires of my heart - a home of our own. We've been wanting a home for the last 12 years of our marriage, somewhere our kids can come back to with thier own families eventually. We've had heartbreak after heartbreak, but the dream still lives. This would make a beautiful "Welcome home baby" quilt or housewarming gift.

IKnitQuiltSew has a blog that showcases more wonderful artisans from HAF. She let us all know that she is recovering from surgery on her rotator cuff. Anyone that knits, quilts, or sews knows the challenge of not having your primary arm available for your craft. Her tenacity and love for her art shows through again, though, because she is still knitting. Albeit slowly - but still knitting!

 I have thoroughly fallen in love with IKnitQuiltSew's creations and am just tickled that I can bring them to you through the HAF blog ring.

Craftsy

Craftsy

LinkWithin

Related Posts Plugin for WordPress, Blogger...