Welcome!

I craft! Spinning, sewing, knitting, quilting...it's all here, along with so much more. I just love making things and writing about them. I hope you'll join me.

Craftsy

Craftsy

Search This Blog

Showing posts with label charity. Show all posts

Friday, January 31, 2014

Friday Tutorial: Finishing the 2 at a Time Hats

We're nearing the end of our hats! This week we're going to finish them up and learn how to decrease stitches using double knitting. You may want to use a cable needle or stitch holder of some sort, as you will need to move stitches around to do the decreases. Once I've made a few decreases and they get closer together, I will usually just move all of the stitches from one hat to a new set of needles to "hold" it and finish them separately. This works out pretty well and is a little less stressful. However, it doesn't work so well when you're working the heel of a sock, so i'm going to explain how this is done - just in case you want to do it.

The pattern tells us to knit 6 and decrease (knit together)2. So for our hats, we'll knit the first 12 stitches (6 blue, 6 orange) and then slip 1 blue stitch.


Slip 1 blue stitch

To get your stitches next to each other you need to drop one orange (back) stitch from your needle, work the knit 2 together with the blue, then place the dropped stitch back on the needle to knit two orange together.

move 1 orange stitch to holder
Move blue stitch back to working needle, knit 2 together
Slip orange stitch back to working needle

2 orange together


 I usually just hold my dropped stitch in my left hand, work the k2tog, then place it back on the needle. However, you CAN use a small cable needle here or a juice pouch straw or something to hold that stitch if you're afraid you can't keep it from dropping and running. We want to be careful we don't knit a blue and orange together either. That defeats our whole purpose.
holding dropped stitch 

If you want to separate the hats to make the decreases, you will need a circular needle or another set of dpns to hold the stitches on one hat. It doesn't have to be the same size, as you're just holding them and can move them back once you complete the first hat.

Working in reverse of our cast on, slip 1 blue stitch to the working dpn. Slip 1 orange stitch to the holding needle. Keep slipping stitches until they are all moved. Pull the inside hat up through the top of the outside hat and lay aside to work later.


Finish your hat as directed in the pattern and voila! you have a hat to share and one to keep. Or give both. Or whatever. I hope you had fun with this tutorial series and learned a lot. I also hope you try this technique with other applications like sleeves and scarves. If you would like to donate your extra hat, would you consider donating it to my charity Warm Up the Boro? I collect donated hats and scarves and hand them out in our community during the cold winter months. You can find out more on our Facebook page http://www.facebook.com/warmuptheboro.

As always, please post pics to the Flickr group!

Tuesday, January 28, 2014

Tuesday Needlework: Yarn Bombing

Obviously I knit and crochet. Obviously I love yarn and many things made from it. I think it is an art form that some master with skill. I find value in wool, cotton, and natural materials gathered, spun, dyed, and distributed. Obviously I think yarn bombing is the biggest waste of time, energy, talent, and yarn that ever existed. Yep, I said it. It's a waste. I'm a huge fan of art, too. Creating it and distributing it and appreciating it. In a wide variety of forms. But to me, yarn bombing is a desperate cry for nothing better to do with one's time than make tubes to tie on trees.

It looks terrible. Nature can never be improved in any way by knitting something to put on it. And defacing someone else's art (statues, sculptures, etc.) by putting YOUR yarn on it is sacrilegious. It irritates me in ways I can't even explain. Especially when I see these long works that took hours to make (and who knows how much wool and/or polluting acrylics) draped over some bush in the park, doing nothing more than interfering with natural beauty and wildlife. And why in the world would it make any kind of a statement to cover a bridge in yarn? The whole thing just grates on my nerves and I want to scream, "DO SOMETHING GOOD WITH YOUR TALENT! If you want to use up yarn and time, do it for a good cause!"

Then, I seen this:

My Facebook was blowing up with it! Not only was it being shared by every single knitting group that I like, but my friends were also sharing it. According to CTVNews this yarn bomber was leaving notes attached that said to "take the scarf it you need it!" Wow. I'm already impressed. No name was associated with it, just a good Samaritan. THIS was impressive. THIS was important. THIS was worthwhile. 

I run an organization called Warm up the Boro. I collect and make hats and scarves to donate to the needy in our community. I've been doing it for a little over a year now, and we just had our first distribution. It's been difficult to get donations locally, so I have some plans to try and expand it. BUT! I wish you could've seen the faces of those that got their new hats this past weekend. Many were overjoyed and enormously thankful. 

Donation day. We had already given out a bunch of hats!

Part of our collection! 
No, I didn't yarn bomb, but I can see the potential in this! Whoever did this doesn't care what your circumstances are, here is a free scarf. This was done with intent and purpose and a great outcome. 

Now, before someone jumps down my throat about my OBVIOUS hatred of yarn bombing, let me say that I DO know that some of these other works are donated to shelters and such after the bombing. That's great. I really can't say anything bad about that. My distaste comes from those that just leave it. I've never met a fire hydrant that needed a scarf. Not. One. Although a dog could probably see some wiping value in it. 

Now about knitting and crocheting food...

Monday, January 27, 2014

Crafty Monday: Time Management Fail

Right here should be a really awesome blog post about making a closet in a weekend. Yep, that's what I had planned. Unfortunately, it didn't happen. Things just didn't come together, I didn't have the right materials, and I spent my Saturday doing something else. Not that I would've done anything differently on my Saturday, but it was just one of those projects where I had an idea, thought it would work, but nothing. Nada. Zip.

I got one part of it done, but it took me most of the day on Sunday. By the time I wanted to finish it, Sunday was nearly over. We were also dealing with two sick children. I also run a charity similar to Warm Up America, but I try to keep it local. It's called Warm Up the Boro and if you're interested, please stop on by our Facebook page and check us out. I spent most of the morning handing out hats and scarves to those that didn't have any at our local soup kitchen. It was so much fun, and such a blessing. Little kids walking out with warm hats that they didn't have previously, and adults that wore theirs the entire time they were there. Even here in South Georgia it's been very cold and the wind chill has been killer. It took a year's effort and many donations to make it happen, but it did. If you follow anything about knitting, you probably saw the scarf on the statue last week? I think that should be up for "Best Possible Use of Yarn Bombing EVER!"

The post that should've been here, that isn't, should be by next Monday. I did put forth good effort. But, things happen I guess. And it gives me fuel for tomorrow's Knitting Tuesday post. :) 

Friday, January 17, 2014

Friday Tutorial: Knitting Two Hats at a Time, Part One

 Remember in Tuesday's knitting post that I promised a tutorial for knitting two hats on a set of double point needless? Here it is! I didn't want to do socks because there are a couple of tutorials and classes out there, the ones I'm familiar with were listed in the last post. But me and my self thought that since we had already done socks, a hat would be a breeze. No short rows for one thing! What is amazing about knitting these two at a time is that you can make a multitude of things using this method. I'm anticipating working some sweater sleeves for one thing. No more single sleeve sweaters!

I'm using a very simple hat pattern from Ravelry by Rachel Sonntag called  Simple Beginner Toddler Hat. It's a basic ribbed brim and stockinette stitch in a worsted weight yearn. If you'd like to follow along with this pattern, please check out her link and download it for free from Ravelry.

Materials:

Pattern Simple Beginner Toddler Hat
4 oz worsted weight yarn in 2 contrasting colors
Size 6 dpns (or size needed to obtain gauge)
Size 6 knitting needle at least 10" long
stitch markers

Ok, once you have your pattern downloaded it is important to note the gauge. Her pattern calls for size 6 dpns and circulars. We're using 4 or 5 dpns only because it more closely relates to doing the socks later. However, you can also use this method on a circular needle. I knit loosely, so I always drop a size down. When knitting two at a time, your stitches are spaced further apart than normal too. So it is a good idea to go down one or two sizes to match the gauge. I'll be using 5 size 4 dpns.

Casting On


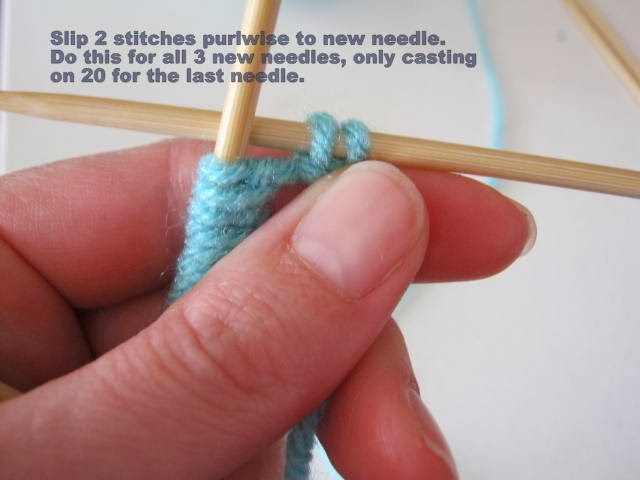
Cast on the required number of stitches for your chosen size. I do this using the super stretchy method for the ribbing (follow link for YouTube video). I cast on to 4 of my 5 needles. When I do this I just work one or two stitches more than I need on the first needle and slip them to the next one so I'm not concerned with making a new stitch.


For example, each of my needles will have 22 stitches for a grand total of 88. I cast 24 on to the first needle, slip 2 to the new needle, and work 22 more, slipping 2, k 22, sl 2, k20. Then join.


Now for the fun part! Knit one round in ribbing. Just like a normal hat. Then when you reach the next round, we join our new yarn and second color.

Joining the new yarn requires that you first cast on the total number of stitches (88 in this case) to a longer straight needle the same size as what you are knitting with.

Long straight needle with 88 stitches cast on
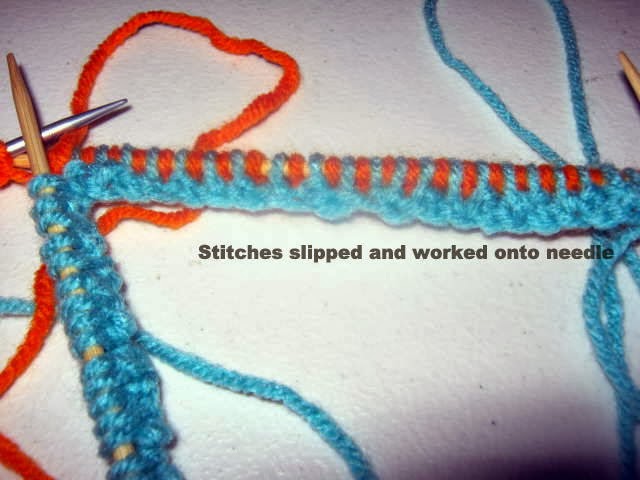
Now, holding the straight needle in back of your first dpn, slip the first stitch from your dpn purl wise. Then, knit 1 stitch from the straight needle. Slip the next stitch purl wise from the dpn (blue) and purl the next stitch. Remember to move your working yarn (orange) back to the back of your work before slipping the next (blue) stitch.


You'll only be working with 1 thread from the straight stitches. In essence, what you are doing is knitting the first row of the second color while placing the stitches onto the dpns. This works much better than trying to cast on each color initially. You're also working in k1, p1 ribbing to match the ribbing on the first row of the first color. Continue to slip stitches from the front row (blue) and working k1, p1 from the back row (orange) until all of the stitches have been worked.

Whew! That's a lot of stitching! If you've made it this far, congratulations. You've cast on your stitches and you're ready to begin the yarn acrobatics of double knitting 2 at a time.


Knitting the Ribbing

For the next part we are going to work with 2 strands of yarn. Your fingers will need some training. I like to hold my yarns with my pointer finger between the two strands, working forward and backward as required. I've tried one of those finger things for stranding and they just didn't work for me. They may for you, though. This is difficult, so don't lose patience. Just keep trying different methods until you find what works for you. 


For row 2, you will hold both strands of yarn to the back because you are working a knit stitch. With your strands separated, knit the first stitch from needle 1 (blue).


Move the blue strand to the front of the work. Knit the next stitch (orange), but keep the yarn to the back.


This should read "Keep yarn forward, knit next orange stitch" 


Purl the next blue stitch and leave your yarn in front as if to purl.


Pull the orange yarn to the front of the work and make your purl stitch. Then move both yarns back to the back. After four stitches you will be in the same position that you started in, with both yarns to the back of the work and ready to make a knit stitch with the first color. 

You will continue to do this until your piece measures what is stated in the pattern. 


I'm going to leave the remaining part of this tutorial for next week. Work on the ribbing, don't get frustrated, and remember that a good cup of coffee is a great cure for aggravation. If you have any questions, feel free to leave them in the comments. You can also find my pattern notes and project on Ravelry

Thursday, January 31, 2013

My dog ate my Knook Hook

No, really, seriously. I recently wrote about my new knooking adventures and our new dog, Brownie. Well, the combination of the two was catastrophic. Brownie is a mess. I pretty much knew what I was getting myself into when we adopted an Australian Shepherd. I knew they were full of energy, needed constant stimulation and play, and if not given those could become destructive. But I am seriously at a loss with this dog. We're going to try to train him with an invisible fence and get him outdoors, where I can spend some time teaching him to use an agility course. Until then, however, we're making do with trying to keep him entertained indoors. We live near a busy highway, even though we out in the country, and we have a few neighbors. Our closes neighbor has some goats. I'm afraid if he gets loose without a fence, we'll have a lawsuit or a dead dog. Any previous or current Aussie owners that would like to give some feedback or support are more than welcome to!

So, Brownie gets bored. And I left my size H hook sitting on the end table, innocently attached to my current project. I took a shower, Brownie tried to knook, couldn't do it, ate it instead. Bye, bye, knook hook. So while I COULD HAVE knitted the piece that the hook was attached to, I casually put it to the side and bought a new and improved set. This time going for the deluxe set that came with more goodies, hooks, projects, and instructions.
Knook Deluxe from LeisureArts.com

It was an excuse. I know. I have also started a new charity organization called, "Warm up the Boro." Basically, I'm teaching others to knit and crochet in exchange for their contribution of a hat or a scarf to be donated to those in our community. Statesboro isn't a big city, and being nestled in the south we don't have A LOT of cold weather, but when it gets cold, it really gets cold. Anyway, for more information on that, please go to http://www.warmuptheboro.blogspot.com . I can currently only teach in my area, but I'm hoping it will spread to other communities too. Maybe even yours?


Craftsy

Craftsy

LinkWithin

Related Posts Plugin for WordPress, Blogger...