Welcome!

I craft! Spinning, sewing, knitting, quilting...it's all here, along with so much more. I just love making things and writing about them. I hope you'll join me.

Craftsy

Craftsy

Search This Blog

Showing posts with label recycle. Show all posts

Monday, April 7, 2014

Crafty Monday: A Crafting Challenge!

**I am updating the challenge so that we can take responses and sign ups until April 28, 2014. The projects will be due by May 16th but can be turned in earlier than that. If you plan to join, please fill in the form below! 

Yes, it is Monday. No, I didn't post anything last week. Yes, I have been very, very busy with kids and quilts. I've come to the conclusion that I will most likely be taking a bit of time off so that I can concentrate on getting my two quilts done in time for my clients - as that is what is the most important aspect of what I do! As for the block of the month and the sewing skill builder, those will hopefully make an appearance this week. I'm sorry for the delay!


But I thought I would sit down here for a bit and send out a challenge! Today as I was searching for some spices to make my slow cooker roast beef for some quesadillas tonight, I realized that my spice cabinet is a disaster. I had just returned from grocery shopping, couldn't find what I needed, didn't want to run out again, and just KNEW that my cumin was somewhere up there in that jumbled up mess. I've been wanting to redo my spices and get them organized for a long time. So I pulled them all out of the cupboard (found what I needed) and decided to do a search for spice organization.

I got a lot of really cool stuff, and of course Pinterest is always awesome, but all of it required that I either order something or run out and buy stuff. Neither of which I really wanted to do. Then I put my mind to work. I needed something to put them in on the door. That was most important. Most are already in jars and containers, and I don't show off the inside of my cupboards very often, so I wasn't concerned with aesthetics.

After a search around the house, my eyes landed on a discarded soon-to-be-recycled cereal box. Were my eyes deceiving me? Was that box the perfect size for a spice jar, yet not so wide that it wouldn't fit inside my cabinet door? Yes, it was perfect!

So I cut down the box, experimented with covering it in both fabric and spray paint (so far going with the fabric), and stapled it to the inside of the door. Voila! Yes, I will do a better tutorial on it on Friday, but guess what! I had made something from found objects in my home that served a much better use than landfill, uh...filler.
Cereal Box Spice storage in fabric


So here is my challenge to you:

Make something useful using discarded and found objects around your house! For this week's challenge (which I hope to have more soon!) it needs to be something to help you get organized. The only rules are that 90% of your item must be made from recycled or on-hand products. Anything from your craft room, tool shed, recycle bin, etc. You get it. No cheating and saying you didn't buy something when you did! Not that I think you will, but hey, gotta throw that out there.

All challenges MUST be submitted to the Flikr group by Sunday, April 13 and a description of your project including the items you used, what it is used for, and how you did it submitted to me at freckledotsquilts (at) gmail (dot) com. Please see above for deadlines and sign ups. You will still need to submit pictures to the Flikr group. Please use the form below to sign up. Then we'll vote on our favorites. The winner will have their project featured on this blog as a tutorial! If you have a handmade store online, this is also great for exposure!

Monday, February 17, 2014

Crafty Monday: Art Room Organizers

Good Monday morning! I try to stay cheerful about Mondays. They get a bad rap most of the time. But I always believe that without Mondays, we would not have the rest of the week to look forward to! Since we do have a Monday, and we show you some pretty cool crafty stuff on Mondays, let's say happy Monday and start on our Crafty Monday project.

Collaged Storage Box 
Along with trying to expand a tiny closet in our bedroom, we're also trying to refurbish a sunroom at the front of the house that is the kids' playroom. They have toys everywhere in there, and I still haven't come up with good storage solutions for all of the toys. It is also exposed to everything because we have giant windows (non-insulated mind you. What WERE they thinking?) and it faces the front of the house. While the geography of the sunroom is completely wrong (faces North with a west and east sidelong glance, should face south) there are a few things we can do with it. Mainly, I've been wanting to change it into an art room capable of doing double duty as a playroom. Art and play go together in my mind!

Right now my kids don't have a centralized place to express their creativity. We use the dining room table, the coffee table, floors, and whatever other space they can find. The same with the art supplies. They're in various places around the house and to actually do a project we have to hunt things down. So I've been organizing some thoughts on a Pinterest board for this project and came across one the other day that was simple, fun, and with a few tweaks could prove awesome.

Follow Freckle Dots (Tammy Lyons)'s board Building a craft room on Pinterest.

Of course, we're going to put up some curtains in this room, which I'll probably hand paint because I'm totally hooked and hubby bought me paints and brushes for Valentine's Day. But we also need storage in there.


This simple organizer was made using paper towel tubes and a shoe box. Her shoe box was very pretty on its own, but I didn't actually have a shoe box available. I had a juice drink box. I also didn't have very many paper towel or t.p. rolls because my husband found my stash and they hit the trash bin. (Bad husband. Bad.) Still, we were having an "ice day" here in the south, the power was out, and the kids were bouncing off the walls.
Supplies

I gathered up the box that I had and scrounged around for containers. I'm always saving back plastic containers of some sort. I also grabbed the Mod Podge, some brushes, old magazines, scrapbook paper, an old calendar, fabric scraps and the kids.
Scrap Supplies

I had to make my box work a little better for our purposes. It had a rather large hole in the bottom of it where the flaps came together. To "fix" it all I did was cut off the top flaps with a box cutter and fill in the hole with one of the flaps. I hot glued it down and I had a sealed bottom.

box


flaps cut off

flap that fit

glued that sucker in there

Scrapbook paper went on first


More collage

And more

And more

Collaged container with fabric, magazine pictures, etc. 

Collaged container

Beginnings of the organizer! 


We spent the afternoon cutting, pasting, collaging, and having a great time. In the end, we had a very unique pen/pencil/marking utensil organizer. We didn't do anything extravagant, but it was fun and we expanded on an idea that someone else had. You could decorate your box with all kinds of great things, even just plain fabric and paints. Hot glue or white glue could be used in place of Mod Podge. It's an awesome way to recycle and create a piece of art - for art. 

Monday, January 20, 2014

Crafty Monday: Recycle Plastic Thread Spools

The Internet is full of functional and crafty reuses of vintage wooden thread spools. Let's admit, these things are cool. We certainly don't want to throw them away because they are vintage. And they don't make them anymore. Now we have plastic thread spools. But what do we do with them?

I hate throwing them away because they take up room in landfills and leave a horrible carbon footprint. To put it lightly, my 4x great grandchildren could come across a discarded thread spool in the remote future. Hopefully people are still sewing by then and they will know what it is. Or at least have some idea what it is. But it will be in near perfect condition without any signs of disintegration. Wow. Ok, now back to the post. 

So I need to put those things to good use NOW. I was on Pinterest the other day (surprise, surprise) and came across a post where someone was selling fabric covered vintage wooden spools. I thought, now why can't I make something like this with the plastic ones? And how would I do it? 

Answer: Decoupage. 

I really love decoupage. It's quick and always turns out great. Well, almost always. 

So here's what I did: 

Materials: 

scrap of fabric (hey! great way to use up scraps too!)
Mod Podge or something homemade
scissors
thread spool
foam brush or paint brush


Directions: 

  1. Measure the inside distance of your spool. Mine was about 1 1/8 
  2. Cut a piece of fabric the width of the spool
  3. Wrap the fabric around the spool and trim so that it overlaps by about 1/2". You could also wrap a fabric tape around the middle making sure it overlaps and cut your fabric to that size. 
  4. Using the foam brush, apply Mod Podge to the spool
  5. Smooth your fabric over the top of the Mod Podge and pull it around. Apply a little more Mod Podge where the strip overlaps to secure it down. 
  6. You can choose to let it dry or go ahead and cover the fabric with another layer of Mod Podge. I just did mine, because I'm not real patient. 
  7. Let everything dry for a few hours. 
  8. Go back, marvel at your new creation, and then use it as a decoration is your sewing room. Hang it from some jute cording or ribbon to make a banner. 

I only had the one to use, because sadly I have been throwing mine out. Now that I see their potential, I'm thinking of other uses for them. Like wrapping unused elastics around them and securing with a pin. Ribbon, binding, cording, piping, and so many other things that end up scattered around in piles or boxes could also be wrapped onto these. They make adorable decorations, too. As a quilter, I generally have many empty thread spools at the end of a quilt. You could also Krylon paint the spools to make them look more like wood or any color you want before adding the fabric. You could use scrapbook paper instead of fabric! The possibilities are unlimited. 

If you make something, would you please consider uploading it to our Flickr group? I'd love to see your creations, as I'm sure many others would too! 

Thursday, January 16, 2014

Thursday Sewing: Making a tree skirt from curtain valances

I had something completely different planned for today's post! And as you can maybe tell I'm a bit late in posting today. What I had planned will have to wait until next Thursday's Sewing Session though. So sorry.

Today I bring you: Making a Tree Skirt from Curtain Valances

This would be a lot more relevant if we were closer to Christmas, but I also never got a chance to post it over Christmas. I was sick most of the time and we had family in from Brazil. So here it is today, and maybe it will give you a head start on your Christmas sewing?

To begin with, I had some old valances laying around that I had picked up at a thrift store, intending to make a silky bag with them. The bags never came to fruition. I needed a tree skirt. The one we had was too small and I wanted something a bit more elegant. And handmade. So I "found" the valances on my fabric shelf and started taking measurements.

With two of them, I had enough material to make the skirt. To make the skirt, I needed to sew them together, make a circular cut out in the middle, and then make eyelets or something similar for the ties on one side.

The first thing I did was to sew them together in the middle, so that the borders were on the outside edges. Then I folded them into halves and quarters so I could easily make a pie-shaped wedge to cut out the circular middle. I really just measured the top of my tree stand, subtracted about 1/2" for seam, and measured from the point to the distance on the ruler. I then cut it and seamed it by folding 1/4" under and running a zig zag stitch all the way around.

During all of this, I'd forgotten that I needed an opening to actually put it around the tree stand. So I cut down the middle of one side, seamed up the sides, and stood back to take a look at it. It needed more. It was just really plain. Here was where my two hour project became four.

I remembered that I had made a filet crocheted set of bells meant to be used as a centerpiece about 11 years ago. They had taken me forever, but were now laying unused in a drawer. I decided they would be perfect for my tree skirt. Sure enough, I got the centerpiece out and laid it across my skirt. Perfect! Now how to sew that sucker on there?

Looking around the craft room, my eyes landed on the can of basting spray I use for quilts. With an Aha! moment and recall of Ashley's post about attaching her crocheted appliques, I set about spraying small sections and applying the piece to the skirt. This probably would've held for a while, but I didn't want to risk it. I pinned the bells around, making sure to keep the slippery material as smooth as possible underneath the bells and the bells flat as well. With a zig zag stitch set for a long length and a short stitch, I carefully sewed the bells to the tree skirt.

For the final touch, I used an eyelet setting on my Janome. I made small holes down the sides of the open edges and then let the Janome do its thing. With little effort on my part, the eyelets were made and nearly perfect. I then laced it all up using some ribbon I had.

So it got a little involved, but I was really happy with the fact that I upcycled the valances and found a new purpose for my unused centerpiece. I also had a brand spanking new tree skirt that didn't cost me a dime to make this year. (I'm not considering the initial cost of the valances which was about $3 and the thread used to crochet the bells, or the ribbon that I had on hand. It was all stuff I had on hand and didn't have to go out to buy.)


With a little thought, looking through your stash, or a fun run through a thrift store, I bet you can find some stuff to make you own Christmas tree skirt for next year. If you make something, would you consider posting it to my group Flickr account? I'd love to see your projects!

*The pattern used for the bells centerpiece was from the November, 2003 issue of Crochet! Magazine and is by Ferosa Harold. You can reference the pattern on Ravelry.


Monday, January 13, 2014

Upcycling Recycling Sweaters

There are hundreds of blogs out there that focus on how to reimagine common everyday items into new practical purposes, most with the intent to keep stuff we throw away out of landfills or to clear out thrift stores. Some of my favorites focus on clothing. It seems one of the tend on Pinterest is to use sweaters (this of course comes after tee shirts and Anthropologie re-dos. What is it with that place anyway? Sure they've got great clothes but is it a price thing? Why not Tommy Hilfiger or something? Can someone explain this?).

It seems the unassuming wool sweater, designed to keep us warm and fashionable throughout winter months and frigid temperatures, also has a day job as a multi-purpose, do-it-all, DIYer's dream come true. From leg warmers to arm cuffs, dog sweaters and beds, purses, scarves, stockings, and mittens there is little that you CAN'T do with a sweater.

Of course, Pinterest fails undoubtedly abound, and it's useful to pay attention to details. However, with a little thought you can probably figure out most of these projects by yourself. It helps to have ideas, though. So the next time your local thrift store has a "fill a bag for $5" promotion or a really awesome sale on sweaters, grab up a whole bunch and squirrel yourself away for a weekend. It's faster than knitting it all individually and you could have done really great accessories. Follow the Pinterest board below for great ideas!

Follow Freckle Dots (Tammy Lyons)'s board Upcycled Sweater Crafts on Pinterest.

Thursday, July 11, 2013

Making a Chicken Tractor from Re-Purposed Items

If you've been reading my blog for a while, you'll know that I'm really big on re-purposing, recycling, and reusing items and materials. I love the cost savings and positive impact on our environment. So when I told my husband I wanted to move the chickens out of their run-down smelly coop and put them in a chicken tractor, he was a bit confused but soon got the picture. So he, also of the thrifty and gifted-in-reuse mind, made one for me!

 Our "tractor" was made using an old Little Tykes playhouse that the kids had long ago abandoned for the coop. He also attached a set of old training wheels. We'll need to find some bigger ones eventually, but they work for now. He also used pallet wood and chicken wire from the old coop to cover the windows, as we don't want our girls tangling with the cats or cars! The caging uses plastic netting left over from my drying rack and carbon fiber rods he salvaged from his work. Not everyone can get the carbon fiber rods, but I've seen people use PVC pipes in much the same way.
He created the frame work and used reinforced carbon tape for the joints, then covered it with electrical tape. (The tape had to be purchased, as did wire ties for attaching the netting to the frame. But it was minimal at about $6 for everything!)

The girls are loving all the crunchy bugs, the fresh green grasses, and access to more area! They haven't given me any eggs yet today, so I'll have to figure out a nesting box inside the coop. They're good and usually give me 4-5 a day, one per gal! Hubs said he'd make another one if I want more chickens. Hmmm...maybe   I'll be looking for a used playhouse soon. :O

Monday, December 26, 2011

Anyone have Keurig K-Cup Crafty Reuse Ideas?

Ok, so my hot ticket present - the only thing I wanted that I thought we could afford this year - was a Keurig coffee maker. For the last 5 or more years we have had a stove top camp-style coffee maker. It's an old one my dad used when we went camping. Made out of some type of gray hard metal with a basket strainer showing years of grease and fire build-up, I was having problems trying to deal with the grinds left in the coffee and the very obvious slick oil left behind in the cup. Plastic coffee makers we have purchased over the years seem to leave a heavy plastic taste in the coffee, so we quit using those. About 2 years ago my mom got a Keurig for Christmas and I fell in love. Not one to spend on myself very often, it sat in the back of my mind until this year.

Now, bear with me a moment while I tell you my morning routine. I get up generally around 5:30-5:45, wake up 4 children to get ready for school, walk the dogs and seek out my morning Java. Some mornings my husband, who is up by 2:30 am and out the door by 3:30, will have time to rinse the pot, pile in the coffee grounds into the basket (if he doesn't have to poke the holes out in it from built-up coffee grounds), fill the pot, put all the parts back together, and make some coffee that takes about 8 minutes to brew. I get up a few hours later, pour the already brewed coffee into my cup, nuke it for a minute, add the cream and sugar, and hope that it is drinkable. All together a single cup of coffee takes about 30 minutes and adds an unknown amount of oil calories to my day, plus time I just don't have. I know it seems superficial, but try this for a while and you'll be just as superficial as I am. :) The idea of putting in a k-cup, pushing the brew button, and having a hot, fresh cuppa in just a few seconds was almost euphoric for me.

My dear husband surprised me with one this year. I enjoyed 2 hot cups of steaming coffee from the variety pack, one last night, and then 2 again this morning. They are delicious! I'm off to get a reusable filter so that I can continue to use my ground coffee, but was wondering what I should do with the K-cups that were provided and those future ones I may use. I don't want to add to the plastic waste in our landfills, so I need something that will be good use and not thrown away later. I'm not interested in reusing the actual cup for coffee, just in creative reuse ideas for them. x I did a Google search and all I can find is ways to reuse the cups in the maker. Any and all ideas are welcome (just keep it clean, people!).

*As a side not I wanted to add that the Keurig is now a member of the family. It makes that little "hmmm, hummm, mmmm" sound when it's heating up the water, like a little monk. So it's now St. Java. :)

Tuesday, July 12, 2011

The Christmas Card

The one thing that I sometimes don't do is Christmas cards. I buy the cards, think about addressing them, possibly do fill them out and address them, then forget to take them to the post office in time for actual pre-event arrival. The cards, in my opinion, are a waste of time and money, not to mention additional environmental sludge. I really put very little emphasis or time into cards because I don't think people really get that much out of them. So my goal this year is to gather some ideas for cards - or greetings - that have a practical use.

Mason jars filled with dry ingredients to make cookies or cupcakes sound like fun, with a little tag that says, "Thinking of you." Practical, reusable, and extremely expensive to ship (in comparison to a card). So if your recipient lives within visiting distance, these are great as drop-off cards. I'm not real creative in this department - so I NEED HELP. (Seriously, not the medical kind, although that may be necessary as well. We'll leave that for another post. ;-))

So if you have any great ideas for practical, reusable, environmentally friendly greeting cards/gifts, let me know. Remember, cheap to ship. You can leave your link to your blog post, tutorial, or just a suggestion. I will tell others where to find you (blog traffic!) or work with you to create a post about your terrific idea on this blog. I've scoured the Internet, and will probably scour some more, to find those ideas. Until then, your input would be much appreciated.


Monday, June 7, 2010

Mattie's Mondays - Edition 1

Mattie and I have been hard at work looking up tutorials and working on one of our own. She patiently droops her head over my leg as I type right now. (However, I think she is slightly irritated at me because I put flea medicine on her. She'll thank me later.) Anyway, we're still in the process of perfecting our tutorial video, so we are going to point you in the direction of some really great online stuff we've found lately. Click on the pictures to follow to the link.

We have involved ourselves in one of the most popular internet sew-alongs going (over 600 and counting). Em-ay-kay-ee (Make) is one of our new favorite blogs and we suggest you check it out! Right now there is a bag sew along with all kinds of accessories to go with it - using a single charm pack and some extras. I subscribed to this through email so I don't miss a single post.


We also have this dress by Nicole Vasbinder that we have all of the materials for, but need time to do. This dress calls for a little bit of materials, and the tut looks easy-peasy. It's printed and ready to go, so I'll keep you updated on it. In the meantime, if you like the look and want to try it yourself, click on the pic.


We'll also try to bring you an upcycled project every week. This helps care for our earth and Mattie's animal friends. She will be especially thankful if you can do your best to help us make our earth a cleaner, friendlier place for all to live! So here is a really cute, useful, and inventive project for upcycling a tissue box. The author states that tissue boxes have such pretty designs on them, that it seemed a shame to waste them. She's right! Check this out.


Have fun being creative. If you make any of this stuff, please let the blog authors know and send us some pics! It would be great to see how you are inspired and how your projects evolve. Again, we'll be working hard on getting our own tutorial ready. There's a lot involved I didn't realize, but we're about 70% there!

Saturday, April 3, 2010

Spring Break

When you have five children on spring break, things get broken. Four of the five are pretty good about not breaking things, but accidents happen. Even today while we were grocery shopping we became the store menace. Nothing was actually broken, accept peace and tranquility, but there was a mess involved. Out of my goodwill and loving heart I bought each of the five a can of soda from the machine outside of the Kroger. They don't usually get soda - sugar, fats, addiction, cavities - all the good stuff. But today, even the baby got his own can of soda. (You're already seeing the disaster in this, aren't you?) So, we proceeded to go shopping. About 1/2 way through the store, baby tips over his coke and spills it from the pork to the chicken, getting it all over my boots and my dress. Then after that mess was reported to the proper authorities (meat guy with a mop), we made it about two more aisles (milk, cheese) before my youngest daughter proceeded to spill her coke. This time mom made them go to the restroom and get paper towels to clean the mess. We moved the wet floor sign over where the spillage was, kids were forced to finish or relinquish their cokes, and we finished our shopping trip.

Also, within the same period of time (one short week) my baby of 2 1/2 years has broken one television, many DVDs, a few toys that don't belong to him, and an armlet. So, to me, spring break means a time of great celebration and joy in the beginning of a fresh new season and hope. However, it also means we will eventually need to replace things. So with that thought in mind, here are some fantastic Etsy finds, in case something of yours get broken - or needs replacing - or you want something new, just in case.

Some Breakable Things...but good to have around

RedCrowArts
Stained Glass Mosaic Mirror

This mirror is not only beautiful to look at, but serves a double purpose. If positioned correctly, you can see what is going on behind you while you are not looking. The kids won't even know they're being watched. Besides, with your lovely face positioned in the center, the image of beauty will be complete!


Warm Country Meadows
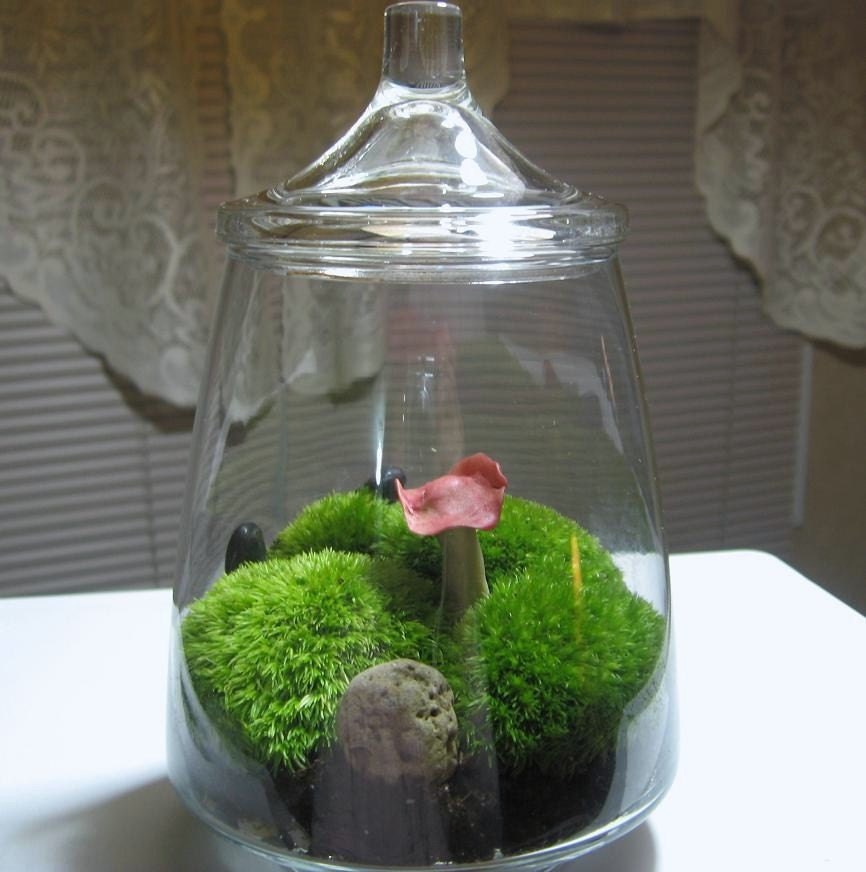
Moss Terrarium Inside of Libbey glass Apothecary Jar

This lovely little world may transport you to another place and time as you gaze longingly into it. The little polymer clay mushroom makes me think I'll see a fairy hiding beneath it or perhaps boldly sitting and tatting upon it. They could hide anywhere in that delicious jungle of greenery. There are times when the noise going on around me is obliterated by the beauty of something serene and natural.


awade1663
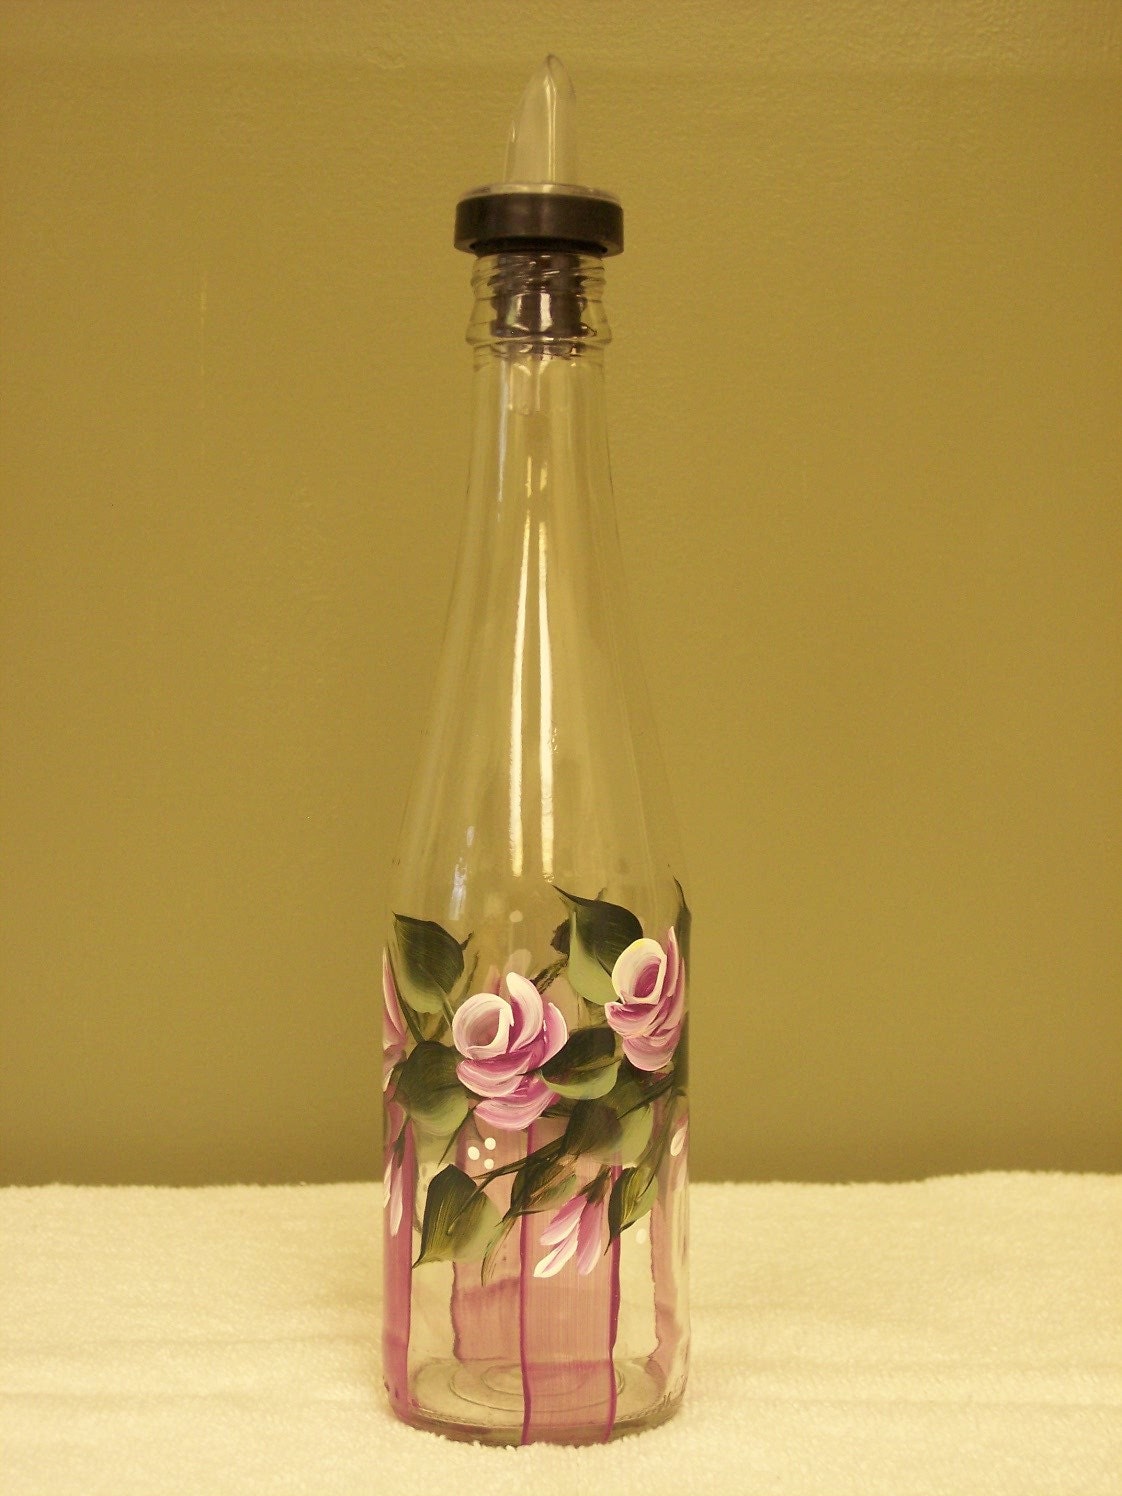
 Hand Painted Rose and Daisy Bottle with Free Flowing Spout

This lovely little bottle would have a variety of uses. I can see it used as a bottle for your favorite vinaigrette dressing to use on those crisp summer salads. However, the artist provides a variety of intriguing uses - making it very wise to invest in a few of these beautiful bottles. If you decorate your life with beauty around you, you feel beauty everywhere. I'd keep this one away from the kids, though!


AND some unbreakable things...


fashiongreentbags

Is It Hot In Here? t-bag

Not sure if this sentiment could apply to me, but I think the idea is on fire! No, this is not a t-shirt. Well, not anymore. It's a bag! This crafty crafter has transformed t-shirts into reusable tote bags that are practical enough to take grocery shopping! I buy A LOT of groceries, and sometimes the bags are so small and expensive that I MUST resort to additional plastic bags. This nearly kills me, so at only $7 and with a ton of room, these won't break the bank, they'll save the world!


Metmorphosi
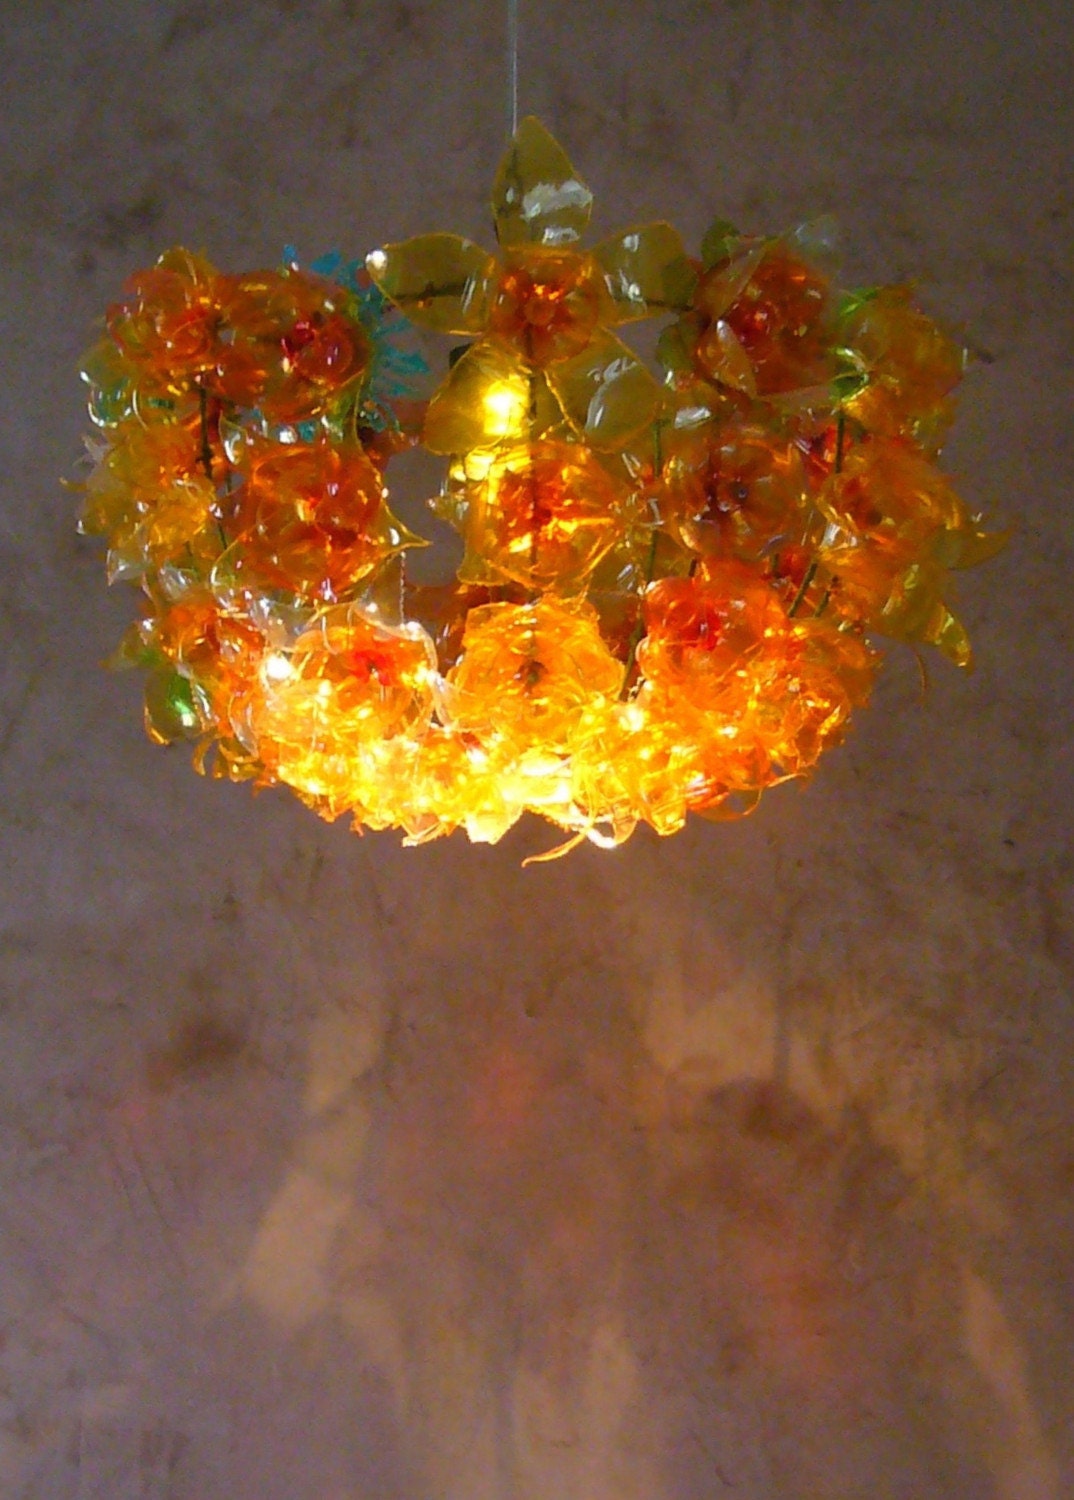
Recycled plastic chandelier DARMALAMP

And who says your lamps and beautiful chandeliers have to be made out of glass? Artist Darma Chavarria says that they can be made of plastic. And better yet, plastic reclaimed from used plastic bottles! This light is so stunning, no one would ever know it is plastic or recycled. The details are magnificent.


bagsagain

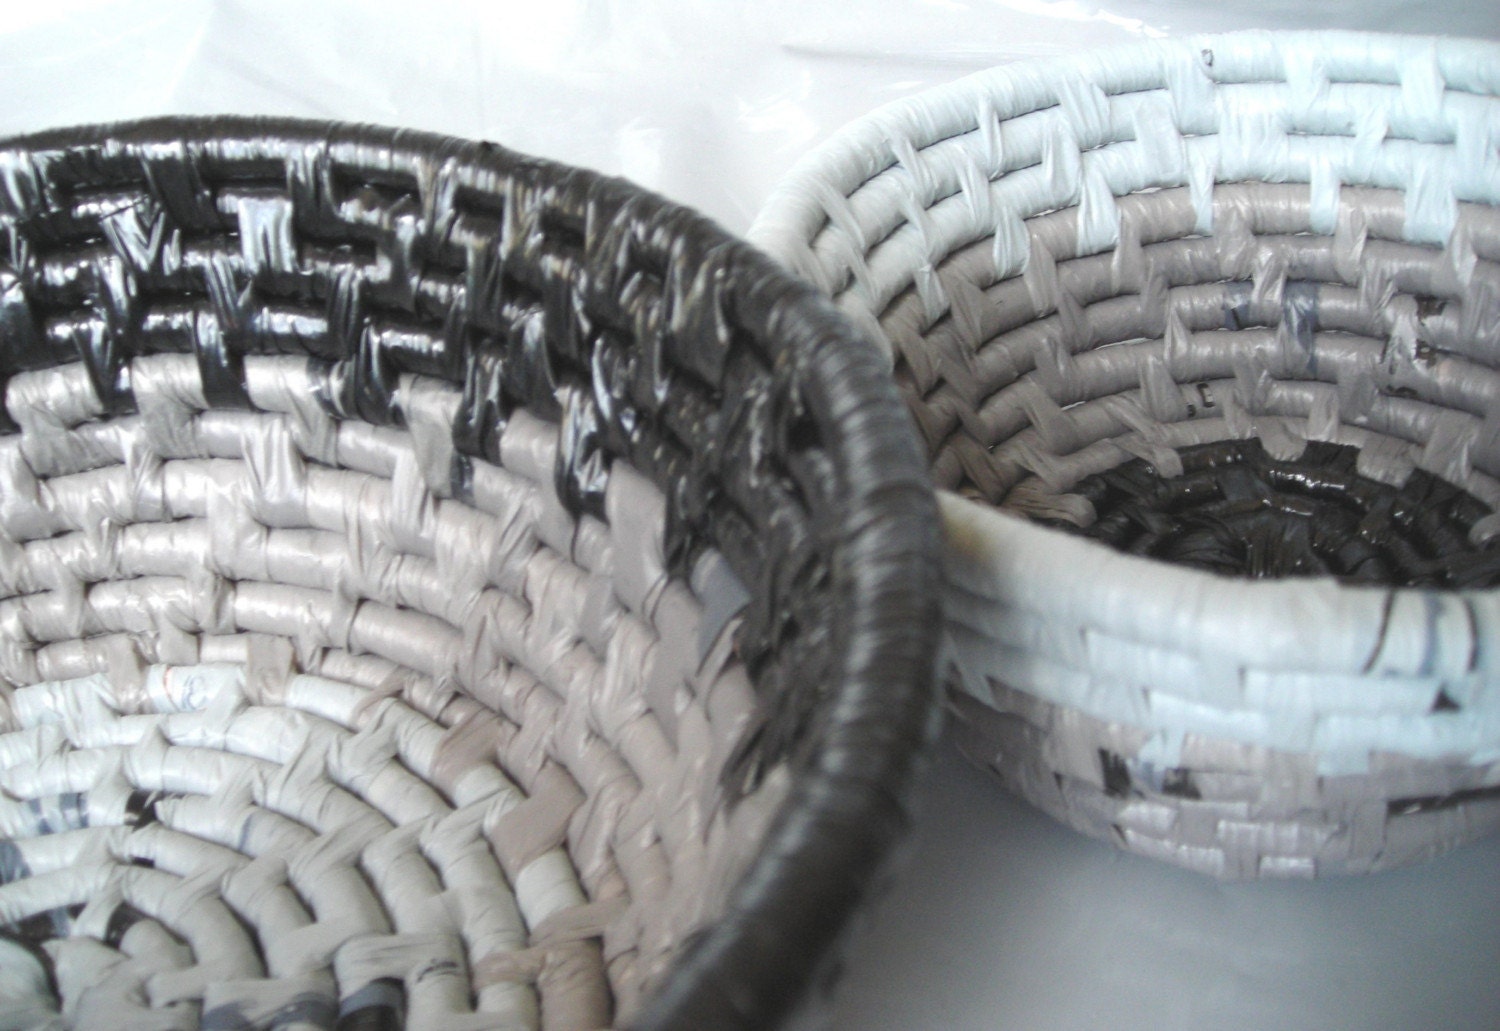
Plarn Coil Basket

I've seen plarn used in a variety of ways, but this is new, useful, beautiful, and most appreciatively unbreakable! I love the colors, the nesting ability, and the variety of uses these plarn bowls could provide. Earth friendly, they make a statement that you are a steward of your environment - and have a ton of chic-ness.



The artisans showcased here today can all be found on Etsy. Just click the links and zoom off to their shops. Shopping and creating handmade are the best ways to save money, time, and the environment. You support small business, artisans that are alive, and reinforce a struggling economy. When you move away from big business that hires overseas and produces cheap goods through slave labor, you make a statement about your values and your commitments. Handmade releases creativity and gives insight into new ideas. You won't see any of these things in the big box stores. Especially any made with the love, devotion, time, creativity, talent, and hard work these artisans put into their crafts.

I give links to books on Amazon that I think you may like, because I think everyone should find their inner crafter. If something appeals to you, look into it. It doesn't hurt to try. You won't be an expert the first time, but you may find something you love to do. So get crafting, people! I need more stuff to showcase.

Craftsy

Craftsy

LinkWithin

Related Posts Plugin for WordPress, Blogger...