Welcome!

I craft! Spinning, sewing, knitting, quilting...it's all here, along with so much more. I just love making things and writing about them. I hope you'll join me.

Craftsy

Craftsy

Search This Blog

Showing posts with label reusable. Show all posts

Monday, January 20, 2014

Crafty Monday: Recycle Plastic Thread Spools

The Internet is full of functional and crafty reuses of vintage wooden thread spools. Let's admit, these things are cool. We certainly don't want to throw them away because they are vintage. And they don't make them anymore. Now we have plastic thread spools. But what do we do with them?

I hate throwing them away because they take up room in landfills and leave a horrible carbon footprint. To put it lightly, my 4x great grandchildren could come across a discarded thread spool in the remote future. Hopefully people are still sewing by then and they will know what it is. Or at least have some idea what it is. But it will be in near perfect condition without any signs of disintegration. Wow. Ok, now back to the post. 

So I need to put those things to good use NOW. I was on Pinterest the other day (surprise, surprise) and came across a post where someone was selling fabric covered vintage wooden spools. I thought, now why can't I make something like this with the plastic ones? And how would I do it? 

Answer: Decoupage. 

I really love decoupage. It's quick and always turns out great. Well, almost always. 

So here's what I did: 

Materials: 

scrap of fabric (hey! great way to use up scraps too!)
Mod Podge or something homemade
scissors
thread spool
foam brush or paint brush


Directions: 

  1. Measure the inside distance of your spool. Mine was about 1 1/8 
  2. Cut a piece of fabric the width of the spool
  3. Wrap the fabric around the spool and trim so that it overlaps by about 1/2". You could also wrap a fabric tape around the middle making sure it overlaps and cut your fabric to that size. 
  4. Using the foam brush, apply Mod Podge to the spool
  5. Smooth your fabric over the top of the Mod Podge and pull it around. Apply a little more Mod Podge where the strip overlaps to secure it down. 
  6. You can choose to let it dry or go ahead and cover the fabric with another layer of Mod Podge. I just did mine, because I'm not real patient. 
  7. Let everything dry for a few hours. 
  8. Go back, marvel at your new creation, and then use it as a decoration is your sewing room. Hang it from some jute cording or ribbon to make a banner. 

I only had the one to use, because sadly I have been throwing mine out. Now that I see their potential, I'm thinking of other uses for them. Like wrapping unused elastics around them and securing with a pin. Ribbon, binding, cording, piping, and so many other things that end up scattered around in piles or boxes could also be wrapped onto these. They make adorable decorations, too. As a quilter, I generally have many empty thread spools at the end of a quilt. You could also Krylon paint the spools to make them look more like wood or any color you want before adding the fabric. You could use scrapbook paper instead of fabric! The possibilities are unlimited. 

If you make something, would you please consider uploading it to our Flickr group? I'd love to see your creations, as I'm sure many others would too! 

Thursday, February 7, 2013

DIY Fashion Redesign

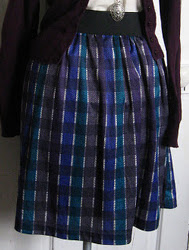
Shirt to Skirt 
I have to admit that I spend quite a bit of time going through each and every link when I get my newsletter from All Free Sewing. I especially love their sections on DIY Fashion Redesigns. This is where crafty bloggers from all over the web are collected in one place to share their tutorials and patterns with the world. The best part? It's all free. Yep, just like the name of the website! (go figure)

There are some ads and links that you'd probably be better NOT clicking on when you go to the site, but I have found that all of the links in the newsletter and on the main site that lead to the patterns are all safe. I have found some pretty terrific ideas on there, many of which I have posted to my Pinterest "Sewing Ideas" board.

Yes, I'm also a Pinterest addict. There. 'Nuff said.

So what to do with all of these ideas? Here is what I do.

You can always raid your closets (yours, your kids', your husband's, your mother's - it's all good). Or you can go thrift store shopping. I really don't have much to raid from anymore, so it's off to the thrift stores for me.

I have a SmartPhone. Well, kinda. It's not that smart, but it is in that classification, so there it is. Anyway, I also have a Pinterest app on my Smart Phone. (I already mentioned my addiction, leave me alone.) When I decide to do some thrift store shopping, I go to my Pinterest app and look at my "sewing ideas" board. This contains some really great links to DIY refashion ideas. I follow the links, see what materials they are using for what inspires me that day, and make my purchases accordingly. It's not too hard. This also usually ends up in a trip to the hobby/sewing store for buttons, elastics, cording, ribbons, etc.

DIY refashion is so awesome because you can make virtually ANYTHING with a little ingenuity. Those high dollar runway items you so covet can be yours with a few tweaks and a sewing machine. Actually, I have completely filled my closet with DIY refashions before and had a whole new wardrobe for the next season. The only thing I haven't done? Cute boots. I love cute boots. I wear boots in the summer. I don't care. I love them. I hate heels, flats, sandals, flip flops -- all of those. But I love my boots and tennis shoes. Hmm...Guess I'll have to figure that one out!

Sunday, January 22, 2012

Junkin' Up My House


Rose Trellis Fountain
Yes, it's true. My beautiful home is filled with junk. Well, other people's junk, anyway. I love thrift and antique stores and my home is beginning to reflect this obsession. I always wanted a home that didn't look so modern (or falling down) that it would really be a canvas for a shabby chic or country look. I'm attracted to things that I can re-purpose or use in ways not originally intended. And I have a hard time finding extreme usefulness in modern-day furniture designs. They leave out utilitarian needs and instead focus only on style. If it were simple enough in my home to focus on style, then I'd be all for it. But the varied interests, needs, and wants of a 7-member family also demands storage, function, and attractiveness. So with these few rules in place, I decided to fill my home with things that make me happy. I mean, why not? Isn't home supposed to be a place you come to when you want to be happy? And filling it with things that don't mean anything doesn't make me happy. So the pieces I'm choosing will most likely also be an eclectic mix of objects, but that's ok, because that suits me.

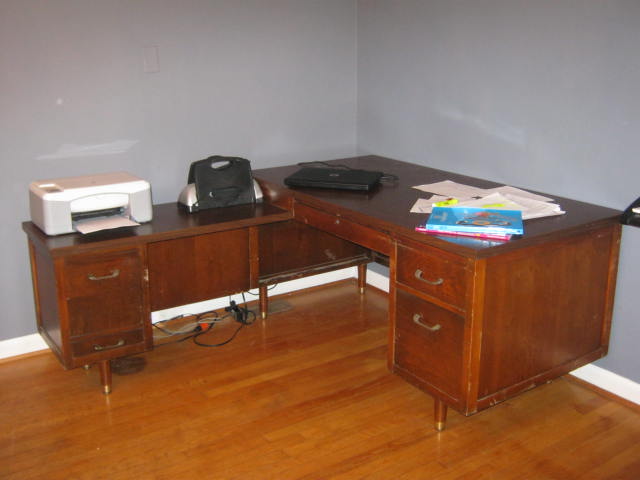
Yesterday my husband and I went thrift store shopping without our children for four entire hours! We found a sitter and went on our mini adventure. We found many things that caught our eye, but we didn't buy it all. Instead we chose some things to go in our fairy garden, a desk for the dining room/office area, and a teapot for our collection. Altogether we spent about $60. Yep, $60, desk included. The desk was at a yard sale, just waiting for us. I'm planning to clean it up, decoupage some scenes on the ends, maybe distress it and add a coat of white paint to it, and change out the handles on it to something a little fancier. It is, after all, in my formal dining room!

My $40 desk
My husband has an idea on how to hook up the fountains using pvc pipe underground, a two-way faucet, and some aquarium tubing. I'll try to take pictures of it when he gets it together.

The little fairy holding the petal bowl will eventually have some miniature roses in it. She will help me tend them. :)

We also started scrounging around the yard and found some old privacy fencing and wood from a building that would be perfect for the garden and for shelving inside the house. So as it all comes together I hope you'll join me in my journey. Your

Rose Garden Fountain

ideas and suggestions are ALWAYS welcome.
A fairy for the garden

Fairy Fountain

Monday, December 26, 2011

Anyone have Keurig K-Cup Crafty Reuse Ideas?

Ok, so my hot ticket present - the only thing I wanted that I thought we could afford this year - was a Keurig coffee maker. For the last 5 or more years we have had a stove top camp-style coffee maker. It's an old one my dad used when we went camping. Made out of some type of gray hard metal with a basket strainer showing years of grease and fire build-up, I was having problems trying to deal with the grinds left in the coffee and the very obvious slick oil left behind in the cup. Plastic coffee makers we have purchased over the years seem to leave a heavy plastic taste in the coffee, so we quit using those. About 2 years ago my mom got a Keurig for Christmas and I fell in love. Not one to spend on myself very often, it sat in the back of my mind until this year.

Now, bear with me a moment while I tell you my morning routine. I get up generally around 5:30-5:45, wake up 4 children to get ready for school, walk the dogs and seek out my morning Java. Some mornings my husband, who is up by 2:30 am and out the door by 3:30, will have time to rinse the pot, pile in the coffee grounds into the basket (if he doesn't have to poke the holes out in it from built-up coffee grounds), fill the pot, put all the parts back together, and make some coffee that takes about 8 minutes to brew. I get up a few hours later, pour the already brewed coffee into my cup, nuke it for a minute, add the cream and sugar, and hope that it is drinkable. All together a single cup of coffee takes about 30 minutes and adds an unknown amount of oil calories to my day, plus time I just don't have. I know it seems superficial, but try this for a while and you'll be just as superficial as I am. :) The idea of putting in a k-cup, pushing the brew button, and having a hot, fresh cuppa in just a few seconds was almost euphoric for me.

My dear husband surprised me with one this year. I enjoyed 2 hot cups of steaming coffee from the variety pack, one last night, and then 2 again this morning. They are delicious! I'm off to get a reusable filter so that I can continue to use my ground coffee, but was wondering what I should do with the K-cups that were provided and those future ones I may use. I don't want to add to the plastic waste in our landfills, so I need something that will be good use and not thrown away later. I'm not interested in reusing the actual cup for coffee, just in creative reuse ideas for them. x I did a Google search and all I can find is ways to reuse the cups in the maker. Any and all ideas are welcome (just keep it clean, people!).

*As a side not I wanted to add that the Keurig is now a member of the family. It makes that little "hmmm, hummm, mmmm" sound when it's heating up the water, like a little monk. So it's now St. Java. :)

Tuesday, July 12, 2011

The Christmas Card

The one thing that I sometimes don't do is Christmas cards. I buy the cards, think about addressing them, possibly do fill them out and address them, then forget to take them to the post office in time for actual pre-event arrival. The cards, in my opinion, are a waste of time and money, not to mention additional environmental sludge. I really put very little emphasis or time into cards because I don't think people really get that much out of them. So my goal this year is to gather some ideas for cards - or greetings - that have a practical use.

Mason jars filled with dry ingredients to make cookies or cupcakes sound like fun, with a little tag that says, "Thinking of you." Practical, reusable, and extremely expensive to ship (in comparison to a card). So if your recipient lives within visiting distance, these are great as drop-off cards. I'm not real creative in this department - so I NEED HELP. (Seriously, not the medical kind, although that may be necessary as well. We'll leave that for another post. ;-))

So if you have any great ideas for practical, reusable, environmentally friendly greeting cards/gifts, let me know. Remember, cheap to ship. You can leave your link to your blog post, tutorial, or just a suggestion. I will tell others where to find you (blog traffic!) or work with you to create a post about your terrific idea on this blog. I've scoured the Internet, and will probably scour some more, to find those ideas. Until then, your input would be much appreciated.


Craftsy

Craftsy

LinkWithin

Related Posts Plugin for WordPress, Blogger...