Welcome!

I craft! Spinning, sewing, knitting, quilting...it's all here, along with so much more. I just love making things and writing about them. I hope you'll join me.

Craftsy

Craftsy

Search This Blog

Showing posts with label diy. Show all posts

Wednesday, January 27, 2016

The Big Room Switch of 2016: Craft room to playroom

This actually started way back in November when my son decided that he wanted to renovate and move out into our attached carport shed. It's a fairly small room, but contains a sink, access to the main home's bathroom, and is about the size of a small bedroom. Perfect for an 18-year-old seeking some privacy and independence. Then about a month later I hear he wants to move into the home of a friend with his girlfriend. Not much I can say or do, since he IS 18 now. I voiced my concerns, but I'm one of those moms that feel a person can only experience the world and the result of their decisions by living through them. Having moved out at 17 myself and over 1000 miles away, I didn't feel that the 30 minutes was unreasonable. So off he went.

Well that prompted "What are we to do with this room that we put so much time, money, and effort into?" My 14-year-old daughter had a suggestion: She wanted it. Hmm...this does solve some problems. We have a 3 bedroom home. One room is shared by me and my husband, of course. Another housed my youngest son, and the third contained 2 teenage girls and 1 preteen. This third bedroom is also the biggest and the Master bedroom. My husband and I had used the smallest bedroom for the last 4 years, choosing to give the space to our 3 daughters. I also had the second largest room in the house, which I was using for my craft room. That left one other room, that was now open. The playroom. When my oldest son moved out, my youngest son was able to move his toys into his own room. Oh, the possibilities!

We decided between the 6 of us that my daughter could take the shed. My other twin would take the craft room. The craft room would move into the playroom/sun room area. My husband and I would take the Master bedroom, and my preteen could have our room. This was going to take some time.

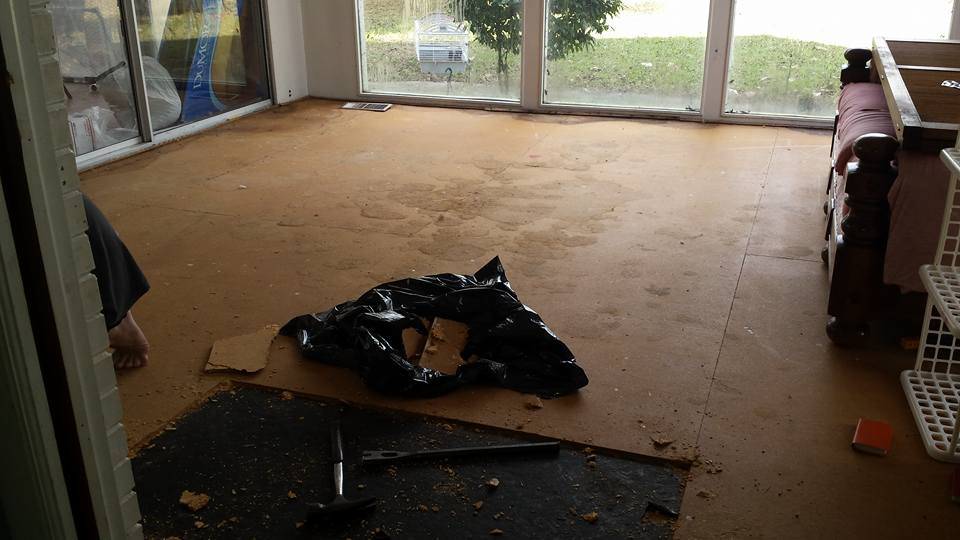
The sun room/playroom needed renovation. The carpet that had been in it was urine soaked from my dog's puppy days and her occasional need to just go in there and pee. We took that out along with the padding. Underneath was some press board sub-flooring that was ruined from condensation on the windows and the urine. So my son and I (mostly I) began removing the sub-floor which took about 2 days. After removing the tar paper, I found that the boards underneath were in really great shape. They needed some filling, a little repair in some places, and painting. However, the cost was reasonable to do this, so we did it.


The windows in this room were terrible about drafts and keeping out the cold/heat. They also had a tendency to get a lot of condensation from drastic temperature differences inside and outside of the home. This caused the condensation to drip down onto the floor and window frames, thus causing mildew problems. The outsides had caulking, thankfully, but the insides had nothing. So after filling in the boards on the floor with backer rod and caulking, I caulked the insides of all of the windows. It worked! No more condensation. I also put weatherproof plastic sheeting over the windows to help with the heating issues. Now to paint! 


I used some Olympic Assure that has a mildew block. It turned out wonderfully in the medium gray that I chose. 

That was the easy part compared to moving everything from the craft room into the smaller sun room. I had a lot! But we managed, I consolidated and eliminated, and now it just needs a little more work and sorting to be finished. Anyone want some fabric? 


I plan to scrape off the old white paint on the bricks (this was at one time the exterior of the house) and paint it a soft yellow. It was the same yellow my mom used in her kitchen. I think it will be lovely and add a bit of color and brightness to the room. And a bit of my mom, as well. 

Look for more posts on the other rooms! 


Monday, February 3, 2014

Crafty Monday: Painting Curtains

Last week I wanted to blog about my adventure in expanding my overly small bedroom closet. My closet is in the smallest bedroom of the house. Inside the closet, is a fireplace. No, not the front of it, but the entire back of it. It is actually a faux fireplace which faces my craft room. Made of marble, concrete, and plaster, it's not something that can be removed to make closet space without contractor! So I needed another solution.
Total Closet Size
Total Closet Size
It didn't work out as planned, but I DID get a few things done to it. The big plan was to move the closet rod to the outside of the closet and hang the clothes in front of it. I didn't really want a big metal rod hanging there with all of the clothes out in the open. The serenity of my bedroom is something I thoroughly enjoy, but this was not conducive to that serenity. So I was also going to put a curtain in front of the clothes. Simple, right? Well, as I explained in the previous post, it wasn't all that simple because I didn't allot enough time, nor did I have all the proper materials ready. *Sigh* This is the bane of many DIY projects.
But I DID have a plan, and I wanted to finish it. First of all, I needed curtains. So what does a crafty sewist do? Ah, yes, I'll make them. And I did. I measured top to bottom and used a 60" wide piece of off-white cotton lining I had bought to reupholster a couch. (Couch left, meaning I had 10 yards of this stuff available.) I cut and sewed them, making a simple header style curtain that could have grommets.
Then I started looking at all of these beautiful curtain panels online. You know, the ones that cost well over $100 each? They were embroidered and woven with beautiful scenes. My plain white curtains just didn't measure up. I decided to paint my curtains. I played it smart this time, though, and made a sampler to try out some techniques.
Cherry Blossom Test Panel
Using the "make cherry blossoms with a soda bottle" pin as inspiration, I tried using the method they had. Ok, soda bottle didn't work out so good. The ones I had, made flowers with spaces way too wide between the petals. So I took out my paint brushes and made little circles with them. Then I added some other colors to the branches and flowers, to see what I like best. Getting a little input from the husband, we went with the pink blossoms lined with a dark pink shade. Now I also had a painted panel I could frame and use to decorate the room! Yay, me!
A couple of days later I laid out my curtain panels and began to decorate them like I had the test sample. Not only was it fun, but I felt really good with paint on my hands and the smell in the air. I used acrylics with a little bit of water. The paint did seep through the fabric a bit, but I had covered the table with some craft paper beforehand. Once it had dried, I pulled it up. It stuck just a little bit, but no big deal.
Here are some progression pictures for you:
Creating the branches
Branches done, ready for blossoms

Painting on blossoms
IMG_4307
More blossoms
IMG_4308
Shading the blossoms
I love how they turned out! I put one across the bed to let it continue to dry, and instantly decided I needed a quilt that matched. One thing leads to another, and I have plans for my first painted, whole cloth art quilt. I love DIY.

Friday, January 31, 2014

Friday Tutorial: Finishing the 2 at a Time Hats

We're nearing the end of our hats! This week we're going to finish them up and learn how to decrease stitches using double knitting. You may want to use a cable needle or stitch holder of some sort, as you will need to move stitches around to do the decreases. Once I've made a few decreases and they get closer together, I will usually just move all of the stitches from one hat to a new set of needles to "hold" it and finish them separately. This works out pretty well and is a little less stressful. However, it doesn't work so well when you're working the heel of a sock, so i'm going to explain how this is done - just in case you want to do it.

The pattern tells us to knit 6 and decrease (knit together)2. So for our hats, we'll knit the first 12 stitches (6 blue, 6 orange) and then slip 1 blue stitch.


Slip 1 blue stitch

To get your stitches next to each other you need to drop one orange (back) stitch from your needle, work the knit 2 together with the blue, then place the dropped stitch back on the needle to knit two orange together.

move 1 orange stitch to holder
Move blue stitch back to working needle, knit 2 together
Slip orange stitch back to working needle

2 orange together


 I usually just hold my dropped stitch in my left hand, work the k2tog, then place it back on the needle. However, you CAN use a small cable needle here or a juice pouch straw or something to hold that stitch if you're afraid you can't keep it from dropping and running. We want to be careful we don't knit a blue and orange together either. That defeats our whole purpose.
holding dropped stitch 

If you want to separate the hats to make the decreases, you will need a circular needle or another set of dpns to hold the stitches on one hat. It doesn't have to be the same size, as you're just holding them and can move them back once you complete the first hat.

Working in reverse of our cast on, slip 1 blue stitch to the working dpn. Slip 1 orange stitch to the holding needle. Keep slipping stitches until they are all moved. Pull the inside hat up through the top of the outside hat and lay aside to work later.


Finish your hat as directed in the pattern and voila! you have a hat to share and one to keep. Or give both. Or whatever. I hope you had fun with this tutorial series and learned a lot. I also hope you try this technique with other applications like sleeves and scarves. If you would like to donate your extra hat, would you consider donating it to my charity Warm Up the Boro? I collect donated hats and scarves and hand them out in our community during the cold winter months. You can find out more on our Facebook page http://www.facebook.com/warmuptheboro.

As always, please post pics to the Flickr group!

Friday, January 24, 2014

Friday Tutorial: Knitting Two Hats at a Time, Part 2

 Last week we left off on finishing up our ribbing for the brim of our hats. We discussed how to cast on to four double pointed needles using two different yarns and how to keep the stitches divided so that we end up with two separate pieces of fabric. This week we're going to take a look at how to make stockinette stitch so we can work on the body of the hats.

Stockinette simply means that we knit every stitch on every row. To do this with our two yarns in double knitting, we will have to bring the front yarn forward and backward, but leave the back yarn in the back. The difference is that we no longer have to worry about moving the back yarn to the front.

Now, this CAN be done without moving either if the yarns and working a reverse stockinette in front (purl every front stitch) and a regular stockinette in back. However, when I did this with my first pair of two-at-a-time socks, I ended up with horrible ladders where the joins were. This method seems to work better.

Following Rachel's pattern, we start knitting in stockinette for the body. To begin, make sure both yarns are to the back and you are starting with your front color (blue in my case) to make a knit stitch.


Make the knit stitch, then move the front yarn to the front of the work.

Make the second knit stitch with the alternate color (orange).


Now move the first color to the back of the work to make the third stitch. Continue in this manner until you have knit you're hat to the length specified for the body before making the decreases.
Knit in stockinette the hat starts to take shape

For part 3 next week we will finish the hat by learning how to decrease the stitches for the top of the hat. 

Monday, January 13, 2014

Upcycling Recycling Sweaters

There are hundreds of blogs out there that focus on how to reimagine common everyday items into new practical purposes, most with the intent to keep stuff we throw away out of landfills or to clear out thrift stores. Some of my favorites focus on clothing. It seems one of the tend on Pinterest is to use sweaters (this of course comes after tee shirts and Anthropologie re-dos. What is it with that place anyway? Sure they've got great clothes but is it a price thing? Why not Tommy Hilfiger or something? Can someone explain this?).

It seems the unassuming wool sweater, designed to keep us warm and fashionable throughout winter months and frigid temperatures, also has a day job as a multi-purpose, do-it-all, DIYer's dream come true. From leg warmers to arm cuffs, dog sweaters and beds, purses, scarves, stockings, and mittens there is little that you CAN'T do with a sweater.

Of course, Pinterest fails undoubtedly abound, and it's useful to pay attention to details. However, with a little thought you can probably figure out most of these projects by yourself. It helps to have ideas, though. So the next time your local thrift store has a "fill a bag for $5" promotion or a really awesome sale on sweaters, grab up a whole bunch and squirrel yourself away for a weekend. It's faster than knitting it all individually and you could have done really great accessories. Follow the Pinterest board below for great ideas!

Follow Freckle Dots (Tammy Lyons)'s board Upcycled Sweater Crafts on Pinterest.

Monday, September 2, 2013

Creating a T-Shirt Quilt: Part 2

As promised in part 1, here is part 2 of making a t-shirt quilt.

So by now you have all of your prep work done and your tees are ready to be sewn together. As so often happens with stretchy material, it doesn't matter how accurate you THOUGHT your cuts were, there are going to be a few that just don't line up or want to stay at the same size you cut them. The starch helps a bunch but it can and will happen. So now what?

The first thing to do is decide if you want to sew your blocks together in rows or in columns. It doesn't really matter what you choose, because the process of lining them up is the same. For this quilt, I decided to sew in columns.

sewn in columns 


Now when sewing, I tend to always use a 1/4" piecing foot, even for the tees. This gives me better control over the seam allowances. Many will insist that a walking foot is the way to go, but when the tees are starched well, the walking foot does not make a difference in how well the pieces sew together. It's actually more beneficial to have a smooth foot because the starch causes them to be a little slicker than regular knit fabrics that are not starched.

1/4" piecing foot

walking foot


When sewing them together, I try to make sure that at least one side and the edge to be sewn are lined up and the same size. If there is a bit of a difference on the other side, that's ok, because you will trim your columns (rows) before putting them together. Just make sure that you don't end up with a difference of more than 1/8", on one side, because this can really make is so the blocks are not centered. Your smallest block will generally rule the rest. You can usually take fabric off, but it's much harder to add strips and put it back on, so be careful in your prep work and pre-cutting!
sections sewn in columns

Once you have the blocks sewn together in strips, it's time for all the fun to begin. Press the seams on the first strip up or right, the second strip down or left, the third strip up or right, and so on. This will help you to "nest" your seams. Trim your strips so they are nice and even down both sides.
Iron in opposite directions for the nest seams


Now you're going to line up those seams. The seams should look like puzzle pieces and fit together so that they lay flat, without a big bulky are where you have two seams on top of each other. T-shirt material can be kind of thick once it is all seamed together. Quilting over it later can actually break a needle!
Nested Seams

Use a pin to secure the seams. Here is where even with all of your careful cutting you'll understand just how stubborn this type of material can be! Some of those seams won't just fall in place and line up. Now we're going to make "stretch" our friend. We're going with the 1/8" rule again, too. As long as your seams are only off by about 1/8", you can stretch them to meet up. Usually the offset is caused by one tee being a little thicker and starched stiffer than another. Once you've pulled them together, pin them. Your seams should all "nest" nicely without any bulges along the side of the seam.

Small gap. No more than 1/8". Make the stretch work for you!


As you sew and come to those seams, you can remove the pins and pull very gently on either the top or bottom section to nest the four corners. It will have little to no effect on the rest of the section and you can continue sewing. If your material starts to bunch up, form a roll or a tuck, or throws the other joins off, you have stretched too much! Keep it at or under an 1/8" and this won't happen.

Seams nested after a tiny pull 


Once all your sections are joined, iron down the new seams. You can iron these in any direction. I usually go with how the fabric is falling. When you sew across them or along them it won't cause problems because your nested seams have decreased unnecessary bulk.

Nicely nested corners, all lined up neatly! 


Ok. You've finished your quilt top! You're on your way to finishing the whole thing!

No wonky seams and everything lined up without bunches! 


Monday, August 12, 2013

Creating a T-Shirt Quilt: Part 1

There is a ton of information on the web about t-shirt quilts. Some is fairly accurate, some is not. I've been making t-shirt quilts for about 2 years now. I started out not knowing a thing about it really, but ended up making a fairly nice quilt with just a few issues. Along the way I've learned a lot and have narrowed my process down pretty good. After about 18-20 quilts, I do finally have a process! So I thought I'd share my process with you.

Part 1: Prep Work


It's all about the prep work! The actual sewing is fairly quick and the quilting is similar to any other with a few exceptions. But the prep work is what makes or breaks your t-shirt quilt. Yes, you CAN just cut them into squares and sew them together. The problem with doing it this way is that you will not end up with similarly sized squares. T-shirts are made to stretch. This is rule #1 in t-shirt quilting. I reiterate: T-SHIRTS ARE MADE TO STRETCH.

The stretching is what causes a majority of problems. When I first started out making my quilts, I didn't know about interfacing. I just did the cut and sew technique. Big mistake. I had bumps, lumps, stretches, and all kinds of other things that I had to work out in the quilting part. The customer liked it and still raves about it, but I know that it could have been better.

I used flannel for the sashing and backing, which was actually a good choice. 

However, after that quilt I had more orders because everyone loved it. So I figured maybe I should look into how they were made. I found some Amazon eBooks that had good information in them and a lot of online tutorials. Most of them said, "Use lightweight interfacing to reduce the stretch." So that's what I did. Time and time again I put at least $10-15 in each quilt using iron-on interfacing. Not to mention cutting it, ironing it on, and spending at least 1 day getting all of the shirts interfaced. Afterward, they would be kind of stiff to the touch and not really what one would expect from a t-shirt material. So I changed my process. 

It is mentioned in a few circles, on blogs here and there, about using liquid starch for temporary interfacing. And see here where I say "temporary?" That's because when the quilt is all finished, you wash it out and ta-da! you have a soft, comfy feels-like-a-t-shirt-quilt. I posted more info on this technique here

With that all said, here are the first few prep steps to get you started: 

Step 1: Cut 

 I cut off the sleeves inside the seam, cut off the collar below the seam, cut across both shoulders and up both sides. Make sure your tee is flat and if need be, ironed, so that you get accurate cuts. 

Step 2: Soaking

Once the tees are cut, use the liquid starch method to soak the tees. Be careful here, because even though some of the tees are probably many years old, they can and will bleed into the water. I soak whites first, then grays, moving toward brights, then reds, and blacks. If any of your tees bleed into the water, take note of them. Also, DO NOT LEAVE YOUR TEES SITTING TOGETHER WHILE WET. They will bleed into each other. I know this from experience. :( 

Step 3: Drying

Lay out your tees to dry. My husband and I devised a special ceiling mounted drying rack to do this because it allows air flow through the top and bottom. It is also up and out of my way and is adjustable. You can use any type of a flat surface, but again be aware of damage to wooden tops and bleeding. Surfaces can bleed onto your tees, too! 

Step 4: Iron

Once your tees are dried they will be stiff and wrinkled. You will need to iron them. 

Using a warm steam setting (between wool and cotton on my iron) carefully press out the tees from the back. The fronts of your tees often have a plastic-type overlay for the image, which can melt. This is also from experience. Lay a press cloth over the image if you must iron over it. I have found that ironing from the back doesn't seem to cause damage. You can also spritz with water on particularly wrinkled areas. Just don't saturate them and rinse out your starch! 
Starch spots on the tees after ironing

When you are ironing you will probably see spots of starch on your tees. This is okay and doesn't affect the tees in any way. It washes out and is quilted over very easily. Just ignore them. Please. 

Step 5: Cut again 

Now it is finally time to cut your tees to size. I have a makeshift template that I use to cut my tees. 

template. zebra stripes are cool.


I used cardboard from a corrugated box and wrapped it with zebra striped duck tape. It is not 100% accurate, but it gives me a good way to view the image, center if at all possible (not on the shirt above), and draw a chalk line around the edge to give me a general idea of where to cut. I then cut about 1/2" beyond my chalk line and even it all up using my ruler. 

Tees all cut even in nice little piles
If there are tees that don't fit the template because they are too small, I will lay them to the side and add sashing, bits of other tees, or if I have enough make a column or row that is a little smaller than the rest. In the image above you can see where I cut 5.5" squares from the fronts to make a 9 patch square, evening out the number of tees. 

Okay, this post has turned out long enough and by the time you've gotten this far your prep work is finished. I can't stress enough though that t-shirts are made to stretch. This is their nature. It can help you or hinder you. Prep work is everything. In my next post I'll take you through sewing them together, what feet to use and machine settings, and how to get those stretchy suckers all lined up right. Until then, if you have any prep work questions, feel free to ask away in the comments and I'll do my best to answer!


Craftsy

Craftsy

LinkWithin

Related Posts Plugin for WordPress, Blogger...