Welcome!

I craft! Spinning, sewing, knitting, quilting...it's all here, along with so much more. I just love making things and writing about them. I hope you'll join me.

Craftsy

Craftsy

Search This Blog

Showing posts with label organization. Show all posts

Monday, April 7, 2014

Crafty Monday: A Crafting Challenge!

**I am updating the challenge so that we can take responses and sign ups until April 28, 2014. The projects will be due by May 16th but can be turned in earlier than that. If you plan to join, please fill in the form below! 

Yes, it is Monday. No, I didn't post anything last week. Yes, I have been very, very busy with kids and quilts. I've come to the conclusion that I will most likely be taking a bit of time off so that I can concentrate on getting my two quilts done in time for my clients - as that is what is the most important aspect of what I do! As for the block of the month and the sewing skill builder, those will hopefully make an appearance this week. I'm sorry for the delay!


But I thought I would sit down here for a bit and send out a challenge! Today as I was searching for some spices to make my slow cooker roast beef for some quesadillas tonight, I realized that my spice cabinet is a disaster. I had just returned from grocery shopping, couldn't find what I needed, didn't want to run out again, and just KNEW that my cumin was somewhere up there in that jumbled up mess. I've been wanting to redo my spices and get them organized for a long time. So I pulled them all out of the cupboard (found what I needed) and decided to do a search for spice organization.

I got a lot of really cool stuff, and of course Pinterest is always awesome, but all of it required that I either order something or run out and buy stuff. Neither of which I really wanted to do. Then I put my mind to work. I needed something to put them in on the door. That was most important. Most are already in jars and containers, and I don't show off the inside of my cupboards very often, so I wasn't concerned with aesthetics.

After a search around the house, my eyes landed on a discarded soon-to-be-recycled cereal box. Were my eyes deceiving me? Was that box the perfect size for a spice jar, yet not so wide that it wouldn't fit inside my cabinet door? Yes, it was perfect!

So I cut down the box, experimented with covering it in both fabric and spray paint (so far going with the fabric), and stapled it to the inside of the door. Voila! Yes, I will do a better tutorial on it on Friday, but guess what! I had made something from found objects in my home that served a much better use than landfill, uh...filler.
Cereal Box Spice storage in fabric


So here is my challenge to you:

Make something useful using discarded and found objects around your house! For this week's challenge (which I hope to have more soon!) it needs to be something to help you get organized. The only rules are that 90% of your item must be made from recycled or on-hand products. Anything from your craft room, tool shed, recycle bin, etc. You get it. No cheating and saying you didn't buy something when you did! Not that I think you will, but hey, gotta throw that out there.

All challenges MUST be submitted to the Flikr group by Sunday, April 13 and a description of your project including the items you used, what it is used for, and how you did it submitted to me at freckledotsquilts (at) gmail (dot) com. Please see above for deadlines and sign ups. You will still need to submit pictures to the Flikr group. Please use the form below to sign up. Then we'll vote on our favorites. The winner will have their project featured on this blog as a tutorial! If you have a handmade store online, this is also great for exposure!

Monday, February 17, 2014

Crafty Monday: Art Room Organizers

Good Monday morning! I try to stay cheerful about Mondays. They get a bad rap most of the time. But I always believe that without Mondays, we would not have the rest of the week to look forward to! Since we do have a Monday, and we show you some pretty cool crafty stuff on Mondays, let's say happy Monday and start on our Crafty Monday project.

Collaged Storage Box 
Along with trying to expand a tiny closet in our bedroom, we're also trying to refurbish a sunroom at the front of the house that is the kids' playroom. They have toys everywhere in there, and I still haven't come up with good storage solutions for all of the toys. It is also exposed to everything because we have giant windows (non-insulated mind you. What WERE they thinking?) and it faces the front of the house. While the geography of the sunroom is completely wrong (faces North with a west and east sidelong glance, should face south) there are a few things we can do with it. Mainly, I've been wanting to change it into an art room capable of doing double duty as a playroom. Art and play go together in my mind!

Right now my kids don't have a centralized place to express their creativity. We use the dining room table, the coffee table, floors, and whatever other space they can find. The same with the art supplies. They're in various places around the house and to actually do a project we have to hunt things down. So I've been organizing some thoughts on a Pinterest board for this project and came across one the other day that was simple, fun, and with a few tweaks could prove awesome.

Follow Freckle Dots (Tammy Lyons)'s board Building a craft room on Pinterest.

Of course, we're going to put up some curtains in this room, which I'll probably hand paint because I'm totally hooked and hubby bought me paints and brushes for Valentine's Day. But we also need storage in there.


This simple organizer was made using paper towel tubes and a shoe box. Her shoe box was very pretty on its own, but I didn't actually have a shoe box available. I had a juice drink box. I also didn't have very many paper towel or t.p. rolls because my husband found my stash and they hit the trash bin. (Bad husband. Bad.) Still, we were having an "ice day" here in the south, the power was out, and the kids were bouncing off the walls.
Supplies

I gathered up the box that I had and scrounged around for containers. I'm always saving back plastic containers of some sort. I also grabbed the Mod Podge, some brushes, old magazines, scrapbook paper, an old calendar, fabric scraps and the kids.
Scrap Supplies

I had to make my box work a little better for our purposes. It had a rather large hole in the bottom of it where the flaps came together. To "fix" it all I did was cut off the top flaps with a box cutter and fill in the hole with one of the flaps. I hot glued it down and I had a sealed bottom.

box


flaps cut off

flap that fit

glued that sucker in there

Scrapbook paper went on first


More collage

And more

And more

Collaged container with fabric, magazine pictures, etc. 

Collaged container

Beginnings of the organizer! 


We spent the afternoon cutting, pasting, collaging, and having a great time. In the end, we had a very unique pen/pencil/marking utensil organizer. We didn't do anything extravagant, but it was fun and we expanded on an idea that someone else had. You could decorate your box with all kinds of great things, even just plain fabric and paints. Hot glue or white glue could be used in place of Mod Podge. It's an awesome way to recycle and create a piece of art - for art. 

Saturday, February 1, 2014

Saturday Musings: Resolutions Report

So how have your new year's resolutions been going? Have you had successes or failures? Are you still working on them and not giving up, or did you call it quits by January 15?
FreeDigitalPhotos.net

I have to say, I'm actually pretty happy with what I've done so far. I had a lot of plans and resolutions, and I've tried working on some of them throughout this month. I posted about also keeping up and organizing my blog better. I haven't given up on any of them, except maybe the Christmas craft one. I've been doing other crafts, though, so I can't say it's entirely a loss.

My list of resolutions was to

1. Learn to spin by wheel and spindle,
2. To make at least one Christmas craft every week  
3. To save money 
4. Spend more time doing outdoor activities such as gardening, hiking, biking, camping, etc. 
5. have all of my Christmas shopping done by November

While I have not yet attempted spinning, I did finish watching my Craftsy class Spindling: From Fluff to Stuff. I took a lot away from the class and have two skeins of roving and a spindle ready for when I have a moment to try it.
Craftsy


Saving money? Yes and no. I'm trying the 52 week savings plan and hoping that I can keep up with it. The first few weeks after Christmas are always very tight for us financially. Which is why I'm trying to save money. So if I can break the catch 22, I'll continue to save. Power bills go up from the cold, we have bills that have piled up because we bought Christmas instead, and my husband loses a good chunk from not working overtime on the holidays. I DID catch up and threw a little extra in the savings account last week, though!

Did I mention it's been cold? With ice piling up this last week, I've been a little hesitant to go outside and attempt any activities. Brr. Biking in 23 degree weather? No thanks. It will get done once it heads back up to the 60s and 70s, though.

FreeDigitalPhotos.net/ Paul Brentnall


Of course, along with those bills in January, I really haven't done any Christmas shopping, either. But I have Pinterest lists and ideas, and getting ready to do a few layaways. I still have 10 months.


One of the things I'm most proud of, however, is that I have kept up on my blog posts for the past 3 weeks! I'm so excited about some of the things we'll be doing. I really hope that you take the time to try out some things I post about and that this blog will become more interactive. If you've missed any of the posts, just click on the page links in the header and find what interests you.

I did dispose of my intent to do a blog for Sunday. A day off sounded much better. It also gives me a day to work on the rest of the week's posts. I've missed the deadline on a few, but the posts are there!

So I'd love to hear how your resolutions are coming along. Did you lose 2 lbs? Get something organized? Spend some time with family? Attempt a new craft?

Please comment below and let me know how you're doing! The worst that can happen is you'll get encouragement to keep on going.


Thursday, January 30, 2014

Sewing on Thursday: Sewing Skill Builder Series

Most of us buy a sewing machine with a singular goal in mind. Learning to sew probably tops the list for those that don't know how. We want to make things. Awesome things. All those things we see on Pinterest! So we buy a sewing machine. And it sits in the corner. Because we can't figure out how to thread it. Or use it. And all those things we had dreams of creating sit in the corner with it. Or fill up our Pin boards.
Bone needles

Which brings up the question, how did people learn to do things before they had the internet? It was passed down from generation to generation. First, people learned to create by hand. They used bones, animal guts, and eventually iron needles.

They passed these techniques down and future generations improved on them. Then in the 1800's the first functional sewing machines were built, but were failed enterprises because of fears the "machines" would put tailors and seamstresses out of business! Elias Howe received the first patent on a working sewing machine in 1846, upon which Isaac Singer stole used Howe's patented mechanism to make a foot treadle machine that became wildly popular. Bellis, Mary. The History of the Sewing Machine. About.com http://inventors.about.com/od/sstartinventions/a/sewing_machine.htm

My circa 1908-1913 Singer Treadle - needs work, but I love it
As everyone was trying to invent the machine, seamstresses across the world were still teaching their daughters the "old ways" of mending, stitching, sewing, and embroidery by hand, in preparation for running their own households. Mothers would sit their daughters down and show them a stitch, then give them instructions to create sample pieces. As the girls worked on their sample pieces, they would create works that blended all of their stitches and lessons together. These became known as samplers and some were quite valuable later on.

So with the background lesson, we come back around to using a sewing machine. Mothers don't always set their daughters down and teach them to sew anymore. Grandmothers may live somewhere far away, have passed away, or never learned themselves. So arts start to disappear. Thankfully, we DO have the internet and books. Lots and lots of books.

I love finding vintage sewing books. They are chock full of information that you can't even find on the internet today. One of these books that I found I have treasured for a long time. It's called Creative Machine Stitchery and is published through Better Homes and Gardens in 1985. I've been wanting to work through it bit by bit and teach myself some new things, making a sampler and putting it to good use.


One of the lessons in the book is on using your machine's potential. Aha! This is sounding good enough to do a skill builder series on!

Sampler pockets for sewing basket
I'm finally going to go through this book step-by-step and share what I learn with you, hopefully teaching you some things along the way and helping you to use that machine sitting in the corner. There are a few lessons and projects that I will not be using, but I'm choosing the ones that I think will help improve and teach sewing. Here is the outline and what you have to look forward to:

Lessons

1-6: Sewing samplers to create sewing basket pockets
You will learn to create various size zig zags, openwork, puffing, couching, smocking, and faux French hand sewing.

7: Assembling the Samplers

8:  Fabric Collage Pin Cushion
We will learn how to do a little pit of applique to make a pin cushion to hang off of our sewing basket sampler.

9. Making a Rug out of Yarn - on the sewing machine
This is one of those very interesting techniques that have been rediscovered and are very exciting for me!

10. Using the machine to stitch on canvas
We'll use our machines to make needlepoint-style stitches on canvas

Materials

These are the materials needed for the first 8 lessons. The other two I'll give you plenty of heads up for as we get nearer.


  • 1/4 yard each of 3 different fabric colors (they use ecru, off-white, and cranberry)
  • 1/2 yard muslin
  • 1/2 yard quilt batting
  • 3 colors of sewing thread to match your fabrics
  • polyester fiberfill
  • 1 package pre-made binding for pockets, 2 pkgs. pre-made binding for alternating pockets and to join pockets. (you can also buy a little extra of your 3 materials to make binding) 
  • 17" 1/4" wide lace
  • 8.5" of 1.25" wide lace beading (I'll be doing a crochet lesson on this before we get to it, so if you can crochet it, don't buy it! Same goes for the doily. I'll be making mine, but not sharing the lesson.) 
  • 17" entredeux (french lace that goes between panels. I will also be giving a lesson on how to make this homemade, but it may be worthwhile to purchase it.) 
  • 1 yard Belgian lace
  • Lace doily (very small, for pincushion)
  • cording of various thickness
  • flower applique
  • typing or stabilizing paper
  • marking pen
  • elastic sewing thread 
Ok, so here's your chance! Let's do this thing and learn how to use that machine! 


Wednesday, January 8, 2014

Blog Organization

I'm not good at organization. I'm one of those people that do things on the spur of the moment, usually involving a last minute attempt to make sure that something is done on time and accurately. This goes for events like birthdays, anniversaries, and major holidays. For some reason I think I have all the time in the world to get things done, but seldom realizing that I have precious little time to do them! Major events usually involve a run to the store at the last minute, on my way to a party, or getting involved with huge crowds because they, too, have forgotten or put it off until the last minute.

My list of resolutions that I so boldly stated on Facebook was
1. Learn to spin by wheel and spindle,
2. To make at least one Christmas craft every week  
3. To save money 
4. Spend more time doing outdoor activities such as gardening, hiking, biking, camping, etc. 
5. that I intended to have all of my Christmas shopping done by November. Yes, I said November.

As I was thinking about number 5, I was also thinking about all of the other stuff that I don't intend to miss, but usually do. Birthdays for extended family, friends, my anniversary...

So, I THEN thought that I would add a bit more to my resolution and try to be a bit more organized with events this year. I found a website that I really like called BigEvents.com. It's free to try for 90 days, and then only $10 a year afterward. I figured, ok, I should know within 90 days if I like it or not and if it works for me. So far, so good.

So after saying all of that, here is the intention behind this post. I'm also going to TRY to organize this blog a little better. It is called Eclectic Technique. Which means that I have a variety of interests and try to cover them all a little at a time. Some days I'll get caught up in quilting posts. Others, a little knitting. And still others, random thoughts like this one. I thought it would be better for my readers if they know what to expect and when! I average about 50 views a day right now, and I really want that to go up this next year. I've had the freaking blog forever, and it's time to take it somewhere. And in trying to keep with all of my resolutions, I'm going to organize the blog so that I can cover some of them!

There are 7 days in a week, which means I can cover 7 topics. So I reviewed my labels for my posts and chose the ones that seem to be used the most. Fortunately, these are also my favorite topics!


  1.  Monday: Crafts -I'll cover general crafts, diy, and things that don't fit into other specific categories
  2.  Tuesday: Knitting/Crochet/Needlework -This is where I'm usually the most eclectic. I enjoy many aspects of needlework and tend to post about a variety of applications for use! 
  3. Wednesday: Quilting - Of course, we have to cover quilting. I may post links to other blog posts I've found helpful, videos, or offer up some advice for those attempting to quilt. Basically, if it involves quilting, it goes here. 
  4. Thursday: Sewing - What is life in the crafty lane without sewing? If it's not quilting, but involves a sewing machine, it goes here. 
  5. Friday: Tutorials - I figure this will give me a weekend and a whole week to figure out. Almost. I'll post more of them. I promise. 
  6.  Saturday: Random Thoughts - You guessed it. Just some random things that I want to write about. Gardening, outdoor activities, biking, hiking, etc. You may or may not enjoy them. You may or may not agree with them. But they're my random musings and open to intelligent, non-emotional, mature discussion. We're not Facebook. We're not name-calling. 
  7. Sunday: Business - Sunday, for me, is always a day to reflect on what the work week will hold starting on Monday. Of course, it's also my church day and I am a Christian, but thoughts wander where they will. Believe it or not, I actually get a lot of calls and inquiries on Sundays and it is also the busiest day for businesses in the internet world. Yeah, I looked that up somewhere. 


Ok. So if you're still with me here, start looking for these posts to begin as early as this coming Monday. I need a day or 3 to get started on the posts and have them scheduled. I'm still working on a double-sided twin quilt, so that must come along at some point too. :) So please bear with me.

As of this posting, you officially only have 1 day and 10 hours to participate in the New Year's Crafty Resolutions Giveaway. You could win a Craftsy class worth $20 to start your crafty resolutions out right!


Monday, January 16, 2012

A step in the right direction

When I really began crocheting in earnest, I started collecting yarn and patterns. At first, it was an innocent hobby. I discovered new yarns that weren't available in my local store. I had to have them, touch them, use them. I went yarn crazy. The patterns became organized on CDs and in filing cabinets. Then the pamphlets required binders with clear pockets to keep them organized. Eventually I had enough of these and books to fill up a bookcase. That was just the beginning.

Being a dedicated Eclectic, I found interest in other crafts. Knitting still required yarn, but new notions, needles, patterns, and books were also in order. Then came some sewing projects. These required fabrics. Yummy, delicious, colorful materials in solids, prints, and patterns that just needed one or two other matching fabrics. And of course, there are ribbons, rick-rack, pins, needles, bobbins, thread...books... you see where this is going.

Quilting required even more books and fabrics and a recent acquisition of said products from another crazy quilter left me with boxes filled and no place to put these wonderful treasures. Of course, I also didn't want to get rid of any of it. This is a sickness that crafters share, creating an idyllic world where they have all supplies on hand so they may continue to craft until they drop.

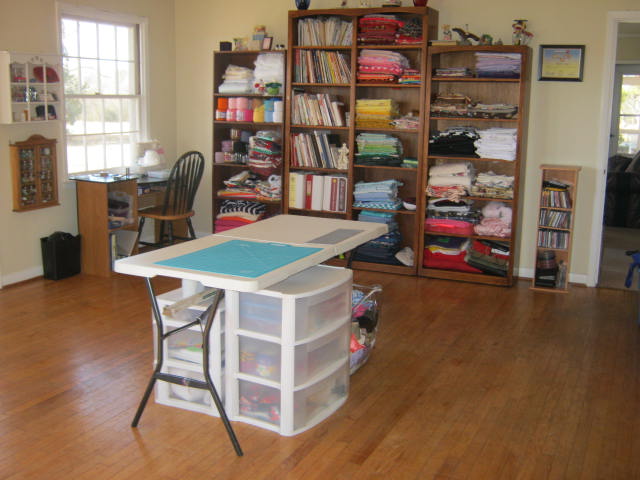
Our recent move not only lifted my heart and spirits, but it also gave me a craft area separate from my sleeping area. An entire room, dedicated to what I love. So after putting away the requisite things in the kitchen, living room, bedroom and bathroom, I got to unpack my sewing room. And I decided that now was the time to organize! It's been more than a week, and I'm almost done. But the rewards are decidedly worth the time and effort. Here is a sample of the fabric shelves:


I have also sorted through all of my sewing notions, eliminated two of the peg boards that were major eyesores, replacing them with storage containers in a cleaned out sewing desk. I do still have one peg board, but that has gone down from the 3 that I previously had that never really worked. 


The sewing machine, jewelry desk (yes, another obsession), and cutting table all have their little areas. I even have room to add a quilting rack if I ever decide that I want to hand quilt. 


I can't wait to get in and finish a couple of quilts and work on some other projects. I haven't even been to my local Hobby Lobby in the last few weeks; probably because of the move, the unpacking, and organizing, but it still counts. Of course, I have the garden coming up in a couple of months, and I'm collecting for that, so I may need some more bookshelves for the books. But we'll take this one step at  a time. :)

Craftsy

Craftsy

LinkWithin

Related Posts Plugin for WordPress, Blogger...