

A couple of weeks ago I mentioned we were going to do a 2014 Block of the Month. This is our first edition of the BOM. We're doing an "Attic Windows" block. I figured there are plenty of tutorials on doing basic four and nine patch blocks, and some people might want a little more meat. This is rated 3 pins on Quilter's Cache and will make a 12" block. All of the blocks we'll be attempting are 12" blocks, so they'll come together to make a nice little 36" x 48" quilt.

For this block you will need:
 I chose to go with orange, because it is my favorite color! I have two that are patterned, but they vary well from light to dark in tone.


 Cut:
Cut:


For this block you will need:
- Pattern from Quilter's Cache
- 3 fabrics: 1 dark, 1 medium, and 1 light colored
- graph paper (or regular typing paper)
- pen
- paper scissors
- rotary cutter
- rotary mat
- matching threads
- ruler with 1/8" markings
- chaco marker or water soluble marking pen
I chose to go with orange, because it is my favorite color! I have two that are patterned, but they vary well from light to dark in tone.
You will need to print out the templates from Quilter's Cache. If, like me, you run into problems getting them to print out correctly, she has the dimensions marked on the template and you can simply draw them onto graph paper. If you want a more permanent template you can trace around the drawings on template plastic and cut those out. Make sure your measurements are accurate and you measure your print out. Mine were way off by 1/4" and I couldn't get my printer to scale them properly. It's really not necessary to make the 3 1/2" template, but I did just to show you.
Cut:
1 - 3.5" x 14" strip from the darkest color
1 - 3.5" x 24" strip from the medium color
1 - 3.5" x 24" strip from the lightest color
Cut the 3.5" x 14" strip of the darkest color into four 3.5" squares.
Lay the trapezoidal piece on the medium color strip, mark, and alternate the trapezoid so that you end up with a rectangle. Cut 4 trapezoids of the medium and of the light. Reverse the direction of the trap as you see in the pattern on page 1.
For the next step, she has us marking a point 1/4" from the corner of the 3.5" square and the miter of the trapezoid. Instead of making a single point, I marked 1/4" on the reverse side of the fabric for each side that would be sewn. The stopping point is where the two lines meet.
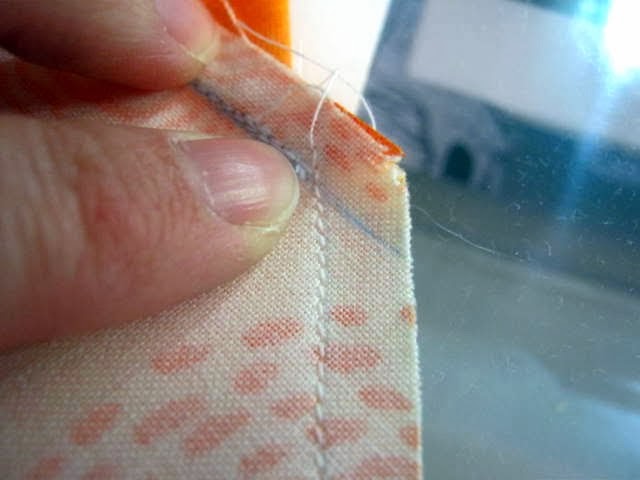
Line up one square with the 3.5" side of the trap and sew a scant 1/4". A scant 1/4" means that it is just outside of the 1/4" line. This way, when you press out your seam you don't lose that little bit of material and have exact 1/4" seams, making your block come out even! You can see on my machine that even though I have a 1/4" piecing foot and a needle setting to match it, I use a rubber band that sets just outside my 1/4" and a regular foot. I find this is more accurate than the 1/4" foot that I have.
Line up your needle so that you are a scant 1/4" from the line and sew just down to where the lines meet or you have placed your mark. Here she also says to press to the middle. I found that this was a little troublesome in getting my second part to match up, so I didn't press it immediately. Maybe I'm wrong, but it worked.
Line up your second trap with the inside edge of the first one. You can lay them out so that you can see how they should fit together. Again, mark your 1/4" and sew just to where the points meet. Now you can press.
Now is the final meeting of all points! Pull your square out to a point and line up the seam lines you've already sewn and the other 1/4" seams of the unsewn sides. Place your needle on the outside of the sewn seams where you stopped and stitch another scant 1/4" seam down the final side.
That's it! Press it out and you have actually made part of your attic windows block. Make 3 more exactly the same and join them together! Isn't your block lovely? Aren't you proud of yourself? You made an attic window block AND tackled the dreaded Y seam. And to be very honest with you, this is my first time ever making this block. Yes. I've never done a Y seam either. So if I can do this, so can you.
Please make sure you post your pictures of your finished blocks (even if they're not perfect) to our Flickr group! I'd love to see what you have done. Please make sure to caption your pictures with credit to Marcia Hohn, Quilter's Cache, and name of pattern.


No comments:
Post a Comment
Thanks for your comments! I try to respond to each and every one. Please note that all comments are moderated and it may take a little while for your comment to appear. :)